网络编程
概述
地球村,也译为世界村(global village),对地球的一种比喻说法。现代科技的迅速发展,缩小了地球上的时空距离,国际交往日益频繁便利,因而整个地球就如同是茫茫宇宙中的一个小村落。
在以前,人们通过邮寄信件交流,现在人们通过网络包进行交流,人们交流沟通的速度和便捷度比以前高出了成百上千倍不止。
当然,在以前和现在,虽然交流方式变了,但仍然存在一些相似性。
在以前,我们通过信件交流,在寄信前,我们需要:
在当今世界,我们将邮寄的方式换成了网络包,相应的我们需要:
- 对方的IP地址(对应对方的地址);
- 对方的端口号(对于对方监听信息的应用);
- 自己的IP;
- 相应的网络传输规则;
这么一对比看来,其实无论是以前还是现在,我们沟通交流的方式其实还是很类似的,不如说是科学技术的进步来源于生活,而又高于生活,技术进步又反馈于生活。
再比如,网络包在网络传输中,最常见,最重要的就是TCP协议和UDP协议,他们都属于网络传输协议。这就好比如今的汽车,并不是谁都能开滴滴去提供运输服务赚钱的,你得先要拿到驾照,有了驾照之后你才能上路拉客而不用担心开到一半被交警查车,赔了夫人又折兵。这里的驾照,就相当于TCP/UDP传输协议,要想让我们的网络包在网络世界里传输,就少不了他俩的身影。当然,网络的世界里也不仅仅只有TCP、UDP这两种传输协议,只不过这两货是最通用最重要的!这就好比骑着白马的不一定是唐僧,也有可能是白马王子。又好比在路上跑的不一定是车,也可以是飞机,是战斗机。
这里咱再对他俩做一个细分,举两个例子。TCP协议就像打电话,打电话是两个人的事,首先你得确保电话能够打通,接着你得确认对方有人接听,然后对方也确认沟通的对象,这样才能算一次牢靠的沟通。
而UDP呢,就像是你发短信,只需要编辑好短信(封好网络包),点击完发送后,后面的事就完全不管了,而你的短信也可能会因为某些原因导致对方没接受到。
无论是TCP协议还是UDP协议,他们都要经过计算机网络传输,就好像开车上路一样,没有修好的路光有车,你面前是一片绿色的森林,这车往哪儿开呢?这不就扯嘛!
那么,什么是计算机网络呢?计算机网络,是指将地理位置不同的具有独立功能的多台计算机及其外部设备,通过通信线路(有线或无线)连接起来,在网络操作系统,网络管理软件及网络通信协议(http、tcp、udp)的管理和协调下,实现资源共享和信息传递的计算机系统。
你可能会感觉到有点困惑,其实也挺好理解的,咋一看这不就是咱四通八达的交通嘛?道路四通八达,连接着我们要去的地方,在红绿灯等交通规范设施的约束下,咱们秩序井然的开着车,可以有目的的出发(TCP),也可以漫无目的的四处游荡(UDP)。
好了,大白话讲到这里,接下来回到我们的主题网络编程了~
网络编程目的
其实目的很简单,我们学习网络编程,主要是为了跑出我们的“圈子”。在没学网络编程之前,我们都是在自己的电脑上跑程序,可“圈子”太小,总有天会腻烦,这不就想着往圈外跑跑,看看外面的世界是多么美好啊!
总结来说,就一句话,我们学网络编程,就是为了我们的程序能够运行在其他地方而不仅仅限于我们的电脑,能够与其他电脑进行数据交换和通信。那么,为了达到这个目的,我们应该怎么做呢?接下来就讲讲我们的主要内容了:
- 如何准确的定位网络上的一台主机 192.168.16.124:端口,定位到这个计算机上的某个资源;
- 找到了这个主机,如何传输数据呢?
javaweb开发指的是网页编程 B/S架构(通过浏览器访问)
网络编程:TCP/IP C/S架构(客户端—qq)
网络通信的要素
如何实现网络通信:
- 通信双方的地址:IP
- 端口号
所以通过IP+端口和具体规则就能定位到网络上具体的计算机上具体的应用
规则:
http、ftp、smtp、tcp、udp…
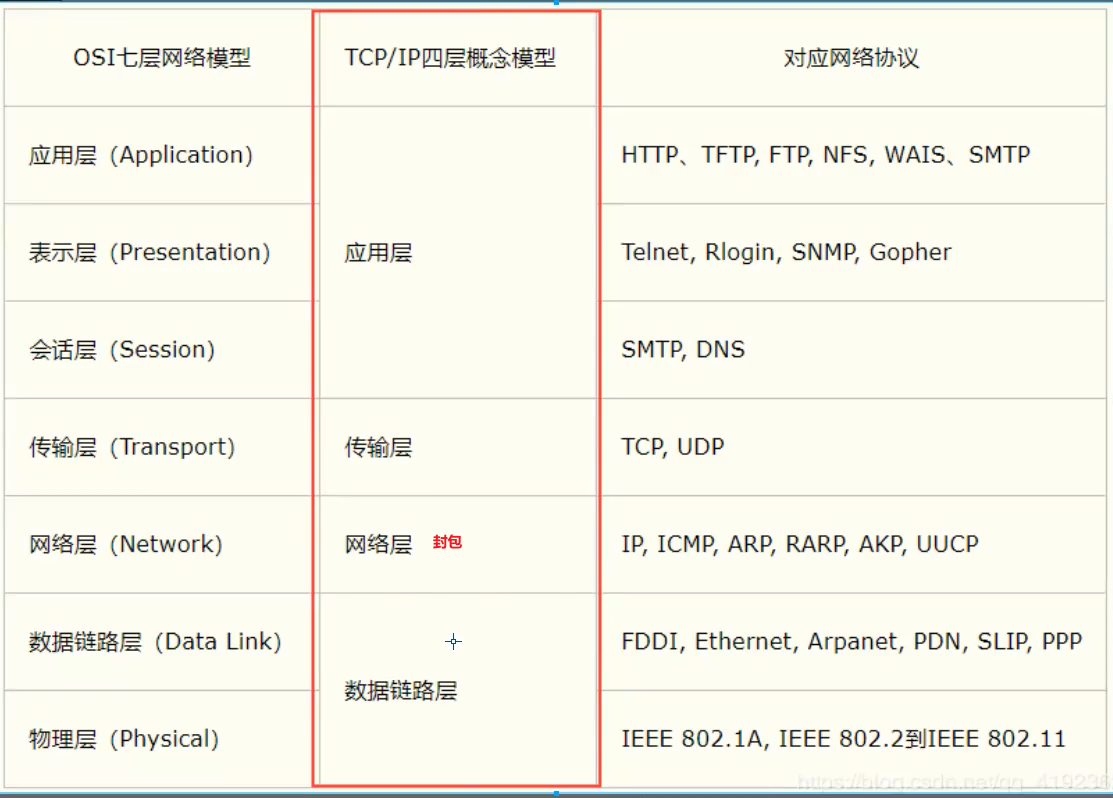
网络模型
TCP/IP四层参考模型(实际应用)
OSI七层参考模型(理想化,并未真正应用)
- 应用层
- HTTP
- TFTP
- FTP
- NFS
- WAIS
- SMTP
- 表示层
- Telnet
- Rlogin
- SNMP
- Gopher
- 会话层
- 传输层
- 网络层
- IP
- ICMP
- ARP
- PARP
- AKP
- UUCP
- 数据链路层
- FDDI
- Ethnernet
- Arpanet
- PDN
- SLIP
- PPP
- 物理层
- IEEE 802.1A
- IEEE 802.2到IEEE 802.11
总结
1.网络编程中有两个主要问题
- 如何准确定位到网络上的一台或者多台主机
- 找到主机之后如何进行通信
2.网络编程中的要素
3.万物皆对象
IP
ip地址:InetAddress
唯一定位一台网络上计算机
127.0.0.1:本地localhost
ip地址分类
ip地址分类(IPv4/IPv6)
- IPv4:由4个字节组成,每个字节长度0-255(1byte=8bit=$2^8$)42亿IPv4,30亿都在北美,亚洲4亿,2011年就用尽;
- IPv6:128位,8个无符号整数
1
| 2001:0bb2:aaaa:0015:0000:0000:1aaa:1312
|
公网和私网分类
- ABCD类地址如何来,一条线折两半,一半A一半B,再折线
- 192.168.xx.xx专门给组织内部使用的
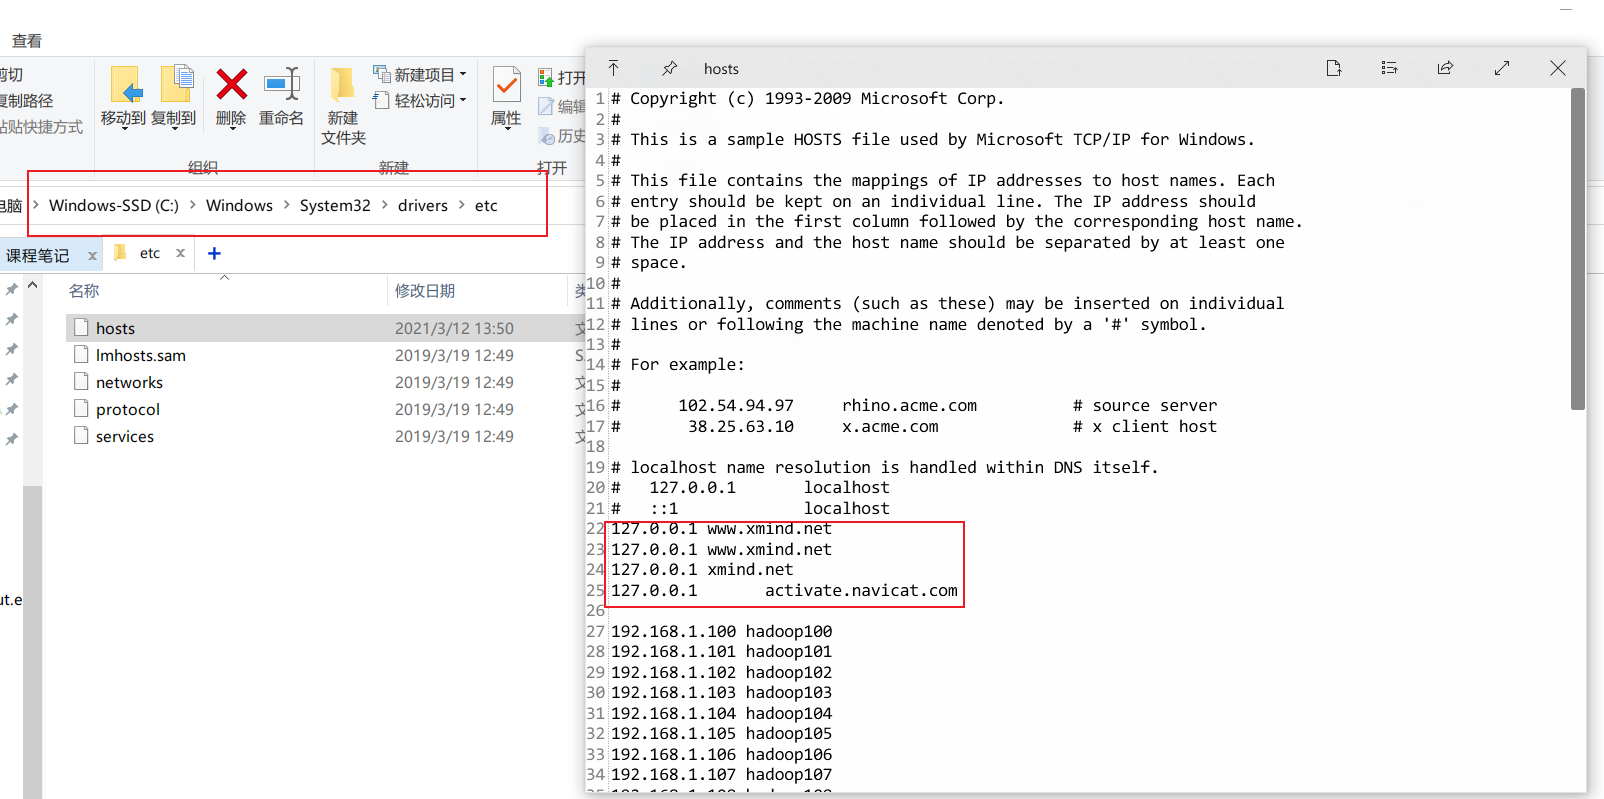
- 域名:记忆IP问题!
在java中,我们通过InetAddress方法获取IP地址协议相关的信息,该类没有构造方法,无法new,只能由静态方法调用。具体代码案例如下:
1
2
3
4
5
6
7
8
9
10
11
12
13
14
15
16
17
18
19
20
21
22
23
24
25
26
27
28
29
30
31
32
33
34
35
36
37
38
39
40
41
42
43
44
45
46
| package com.everweekup.Net.Tcp;
import java.net.InetAddress;
import java.net.UnknownHostException;
public class InetAddressTest {
public static void main(String[] args) {
InetAddress inetAddress1 = null;
try {
inetAddress1 = InetAddress.getByName("127.0.0.1");
System.out.println(inetAddress1);
InetAddress inetAddress3 = InetAddress.getByName("localhost");
System.out.println(inetAddress3);
InetAddress inetAddress4 = InetAddress.getLocalHost();
System.out.println(inetAddress4);
} catch (UnknownHostException e) {
e.printStackTrace();
}
InetAddress inetAddress2 = null;
try {
inetAddress2 = InetAddress.getByName("www.baidu.com");
System.out.println(inetAddress2);
System.out.println(inetAddress2.getAddress());
System.out.println(inetAddress2.getCanonicalHostName());
System.out.println(inetAddress2.getHostAddress());
System.out.println(inetAddress2.getHostName());
} catch (UnknownHostException e) {
e.printStackTrace();
}
}
}
|
端口
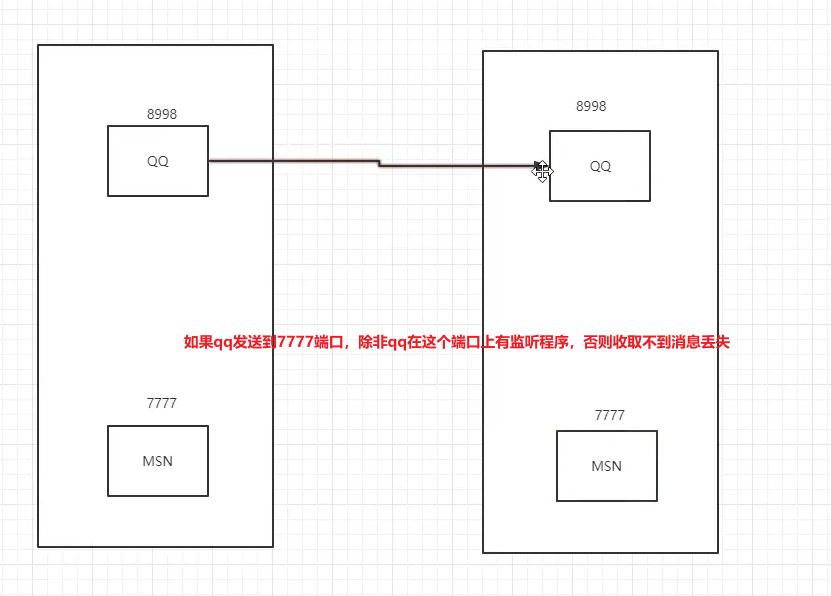
端口表示计算机上的一个程序的进程;
通信协议
协议:约定,就好比我们现在说的是普通话。
网络通信协议:速率、传输码率、代码结构、传输控制…
问题:非常的复杂?
大事化小:分层!
TCP/IP协议簇:实际上是一组协议
重要:
出名的协议:
TCP 和 UDP对比:
TCP:打电话
1
2
3
4
5
6
7
8
9
| A:你瞅啥? 第一次:告诉B,我们能交流?
B:瞅你咋地? 第二次:回应,并确定A是否还在
A:干一场! 第三次:最少需要三次才能保证稳定连接
A要和B断开了
A:告诉B我要断开了
B:我知道你要断开了
B:你真的断开了吗?
A:我真的断开了!
|
UDP:发短信
- 不连接、不稳定
- 客户端、服务端:没有明确界限,可以是客户端给客户端发
- 不管有没有准备好,都可以发给你
- 导弹攻击
- DDOS:洪水攻击!发一堆无用信息包,堆积端口,饱和攻击,导致网络瘫痪
TCP
客户端
- 通过socket连接服务器
- 发送消息
1
2
3
4
5
6
7
8
9
10
11
12
13
14
15
16
17
18
19
20
21
22
23
24
25
26
27
28
29
30
31
32
33
34
35
36
37
38
39
40
41
42
43
44
45
46
47
| package com.everweekup.Net;
import java.io.IOException;
import java.io.OutputStream;
import java.net.InetAddress;
import java.net.Socket;
import java.net.UnknownHostException;
public class TcpClientDemo01 {
public static void main(String[] args) {
Socket socket = null;
OutputStream os = null;
try {
InetAddress serverIP = InetAddress.getByName("127.0.0.1");
int port = 9999;
socket = new Socket(serverIP, port);
os = socket.getOutputStream();
os.write("你好,欢迎光临小店".getBytes());
} catch (Exception e) {
e.printStackTrace();
}finally{
if (os != null){
try {
os.close();
} catch (IOException e) {
e.printStackTrace();
}
}
if (socket != null){
try {
socket.close();
} catch (IOException e) {
e.printStackTrace();
}
}
}
}
}
|
服务器
- 建立服务的端口serverSocket
- 等待用户的连接 accept
- 接收用户的消息
1
2
3
4
5
6
7
8
9
10
11
12
13
14
15
16
17
18
19
20
21
22
23
24
25
26
27
28
29
30
31
32
33
34
35
36
37
38
39
40
41
42
43
44
45
46
47
48
49
50
51
52
53
54
55
56
57
58
59
60
61
62
63
64
65
66
67
68
69
70
71
72
| package com.everweekup.Net;
import java.io.ByteArrayOutputStream;
import java.io.IOException;
import java.io.InputStream;
import java.net.ServerSocket;
import java.net.Socket;
public class TcpServerDemo01 {
public static void main(String[] args) {
ServerSocket serverSocket = null;
Socket socket = null;
InputStream is = null;
ByteArrayOutputStream baos = null;
try {
serverSocket = new ServerSocket(9999);
while (true){
socket = serverSocket.accept();
is = socket.getInputStream();
baos = new ByteArrayOutputStream();
byte[] buffer = new byte[1024];
int len;
while ((len = is.read(buffer)) != -1){
baos.write(buffer, 0, len);
}
System.out.println(baos.toString());
}
} catch (IOException e) {
e.printStackTrace();
}finally{
if (baos != null){
try {
baos.close();
} catch (IOException e) {
e.printStackTrace();
}
}
if (is != null){
try {
is.close();
} catch (IOException e) {
e.printStackTrace();
}
}
if (socket != null){
try {
socket.close();
} catch (IOException e) {
e.printStackTrace();
}
}
if (serverSocket != null){
try {
serverSocket.close();
} catch (IOException e) {
e.printStackTrace();
}
}
}
}
}
|
文件上传
读取文件,将其变成一个流,然后传出去。
客户端
1
2
3
4
5
6
7
8
9
10
11
12
13
14
15
16
17
18
19
20
21
22
23
24
25
26
27
28
29
30
31
32
33
34
35
36
37
38
39
40
41
42
43
44
45
46
47
48
49
50
| package com.everweekup.Net;
import java.io.*;
import java.net.InetAddress;
import java.net.Socket;
public class TcpClientFileDemo01 {
public static void main(String[] args) throws Exception {
Socket socket = new Socket(InetAddress.getByName("127.0.0.1"), 9000);
OutputStream os = socket.getOutputStream();
FileInputStream fils = new FileInputStream(new File("G:\\Desktop\\Learn\\77天Java学习\\java_l\\src\\com\\everweekup\\Net\\wallhaven-6od3px.jpg"));
byte[] buffer = new byte[1024];
int len;
while((len = fils.read(buffer)) != -1){
os.write(buffer, 0 ,len);
}
socket.shutdownOutput();
InputStream inputStream = socket.getInputStream();
ByteArrayOutputStream baos = new ByteArrayOutputStream();
byte[] buffer2 = new byte[1024];
int len2;
while((len2=inputStream.read(buffer2)) != -1){
baos.write(buffer2, 0, len2);
}
System.out.println(baos.toString());
baos.close();
inputStream.close();
fils.close();
os.close();
socket.close();
}
}
|
服务端
1
2
3
4
5
6
7
8
9
10
11
12
13
14
15
16
17
18
19
20
21
22
23
24
25
26
27
28
29
30
31
32
33
34
35
36
| package com.everweekup.Net;
import java.io.*;
import java.net.ServerSocket;
import java.net.Socket;
public class TcpServerFileDemo01 {
public static void main(String[] args) throws Exception {
ServerSocket serverSocket = new ServerSocket(9000);
Socket socket = serverSocket.accept();
InputStream is = socket.getInputStream();
FileOutputStream fos = new FileOutputStream(new File("receive1.jpg"));
OutputStream os = socket.getOutputStream();
os.write("我接收完毕,你可以断开了".getBytes());
byte[] buffer = new byte[1024];
int len;
while((len=is.read(buffer)) != -1){
fos.write(buffer, 0, len);
}
fos.close();
is.close();
socket.close();
serverSocket.close();
}
}
|
TomCat
服务端
客户端
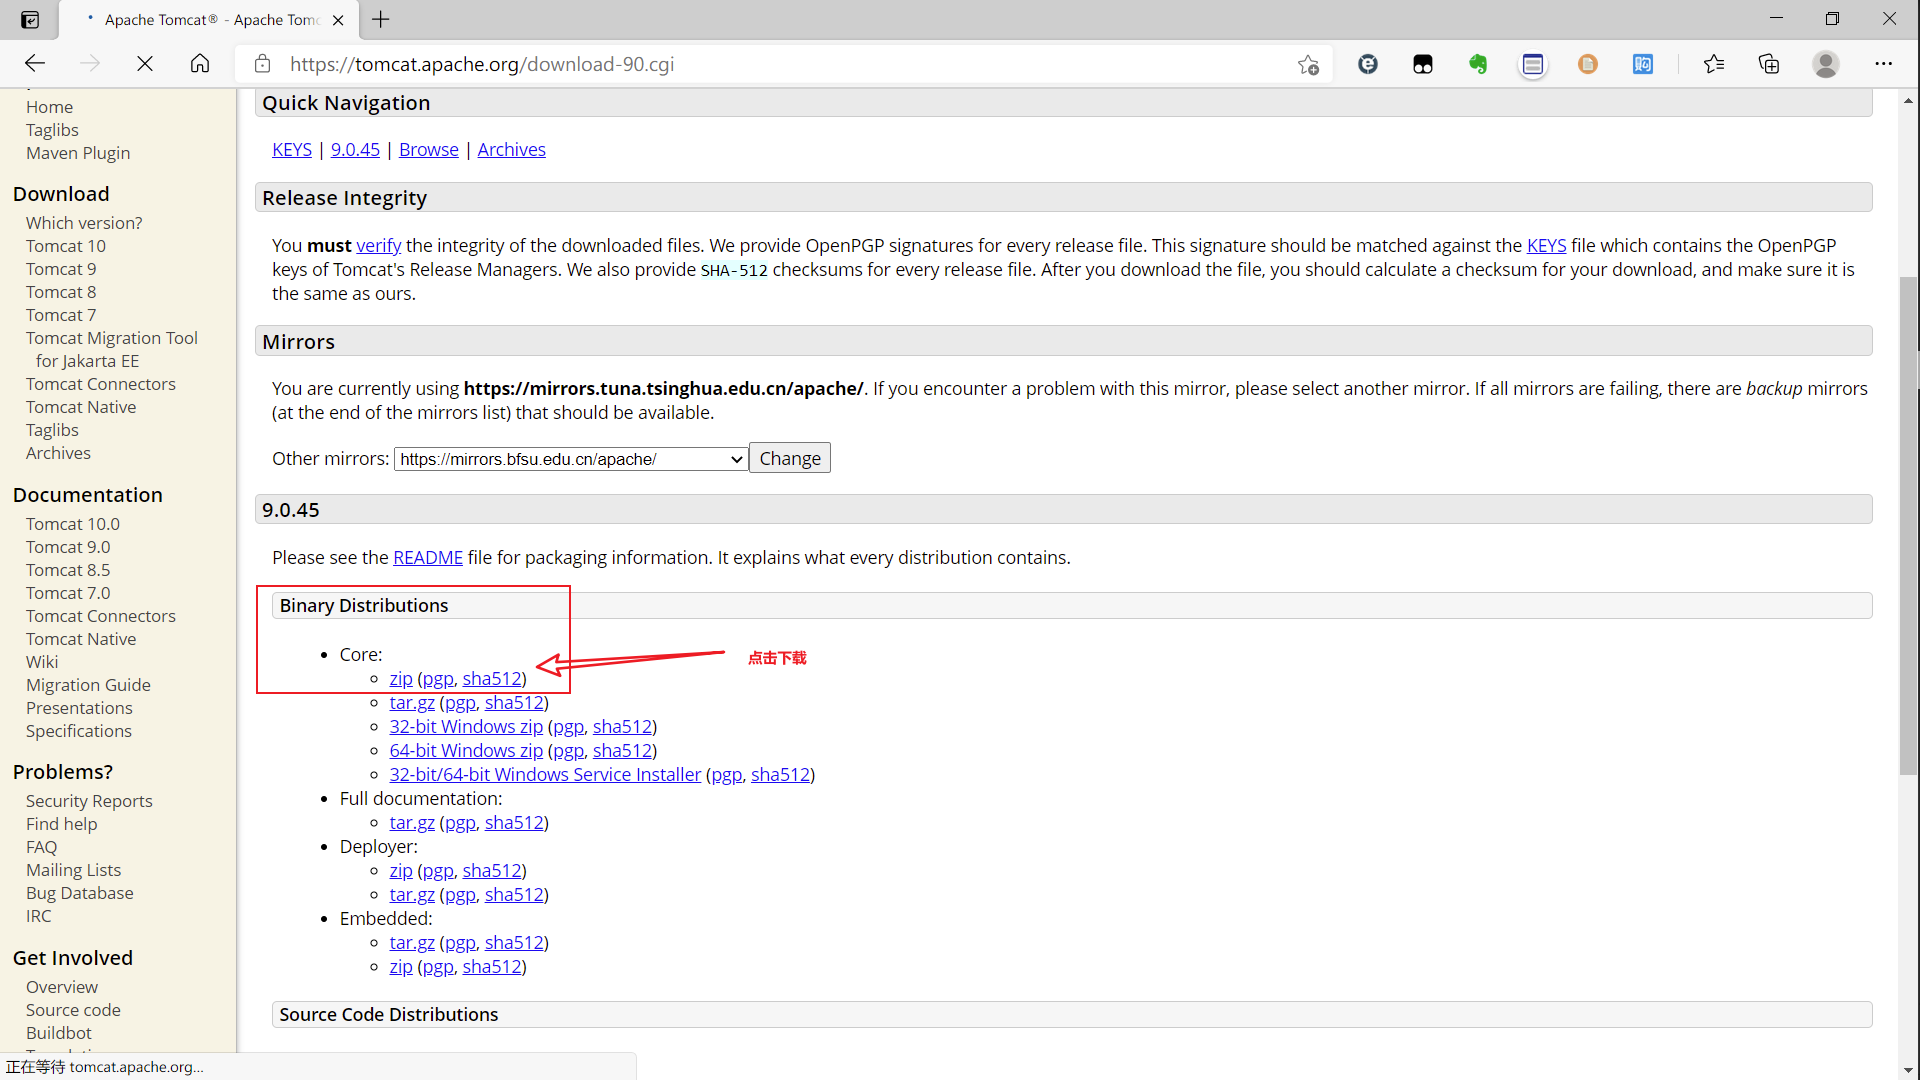
安装
Tomcat下载地址
解压缩包后进入,启动运行:(bat是windows的可执行程序,sh是linux的)

可以看到终端出现乱码,主要是因为windows和tomcat的编码格式不一样,我们可以修改。
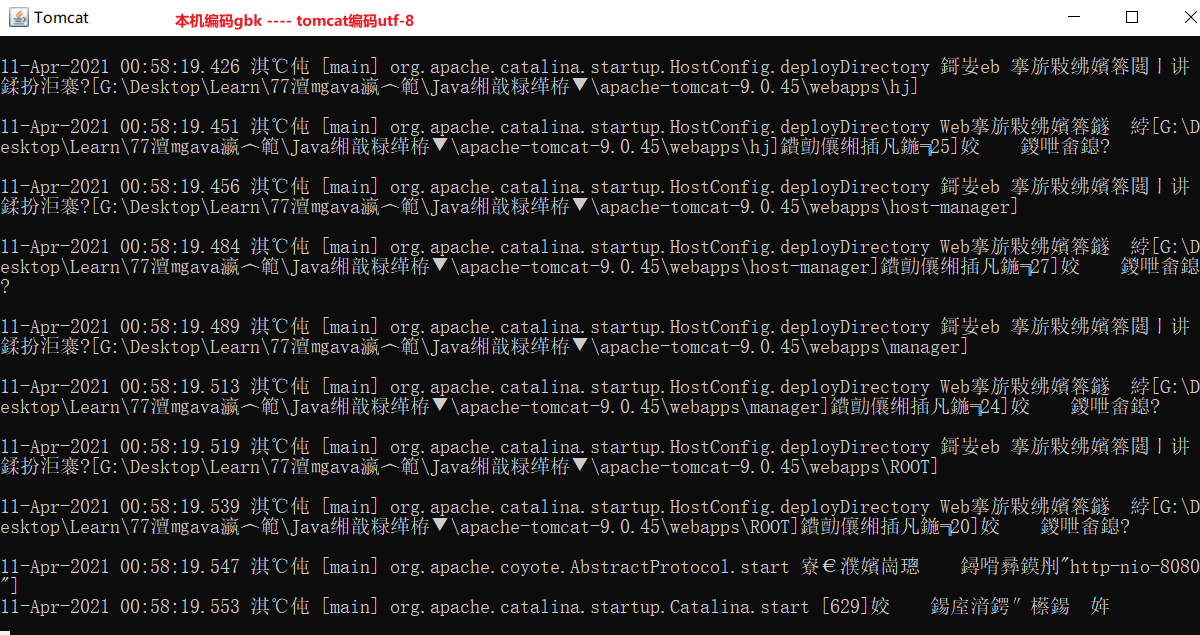
去tomcat根目录下的conf目录修改logging的编码配置:
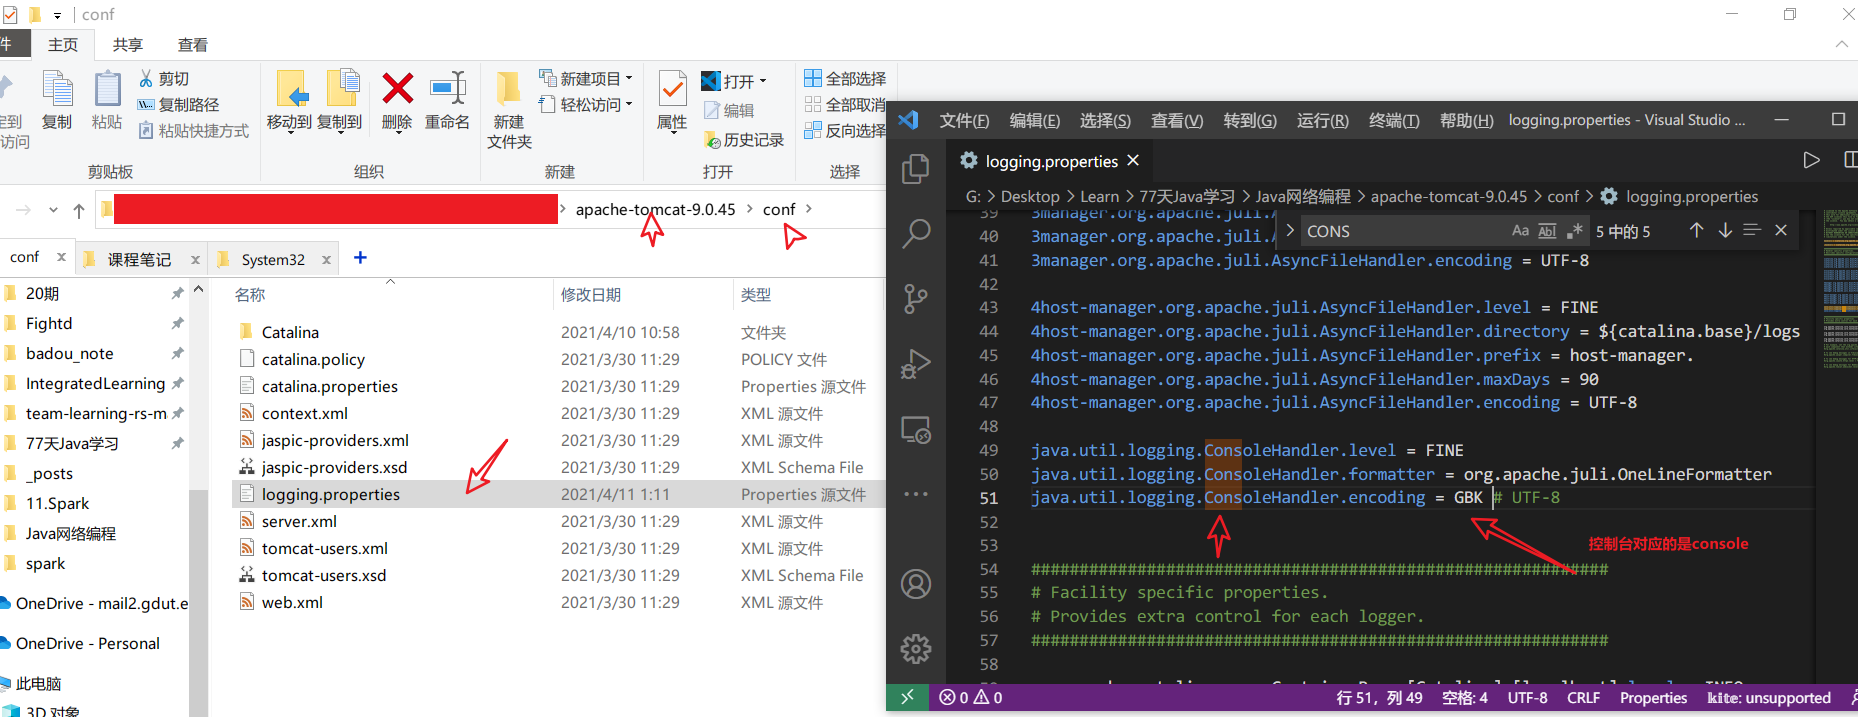
修改后保存重启,发现输出不再乱码:

应用
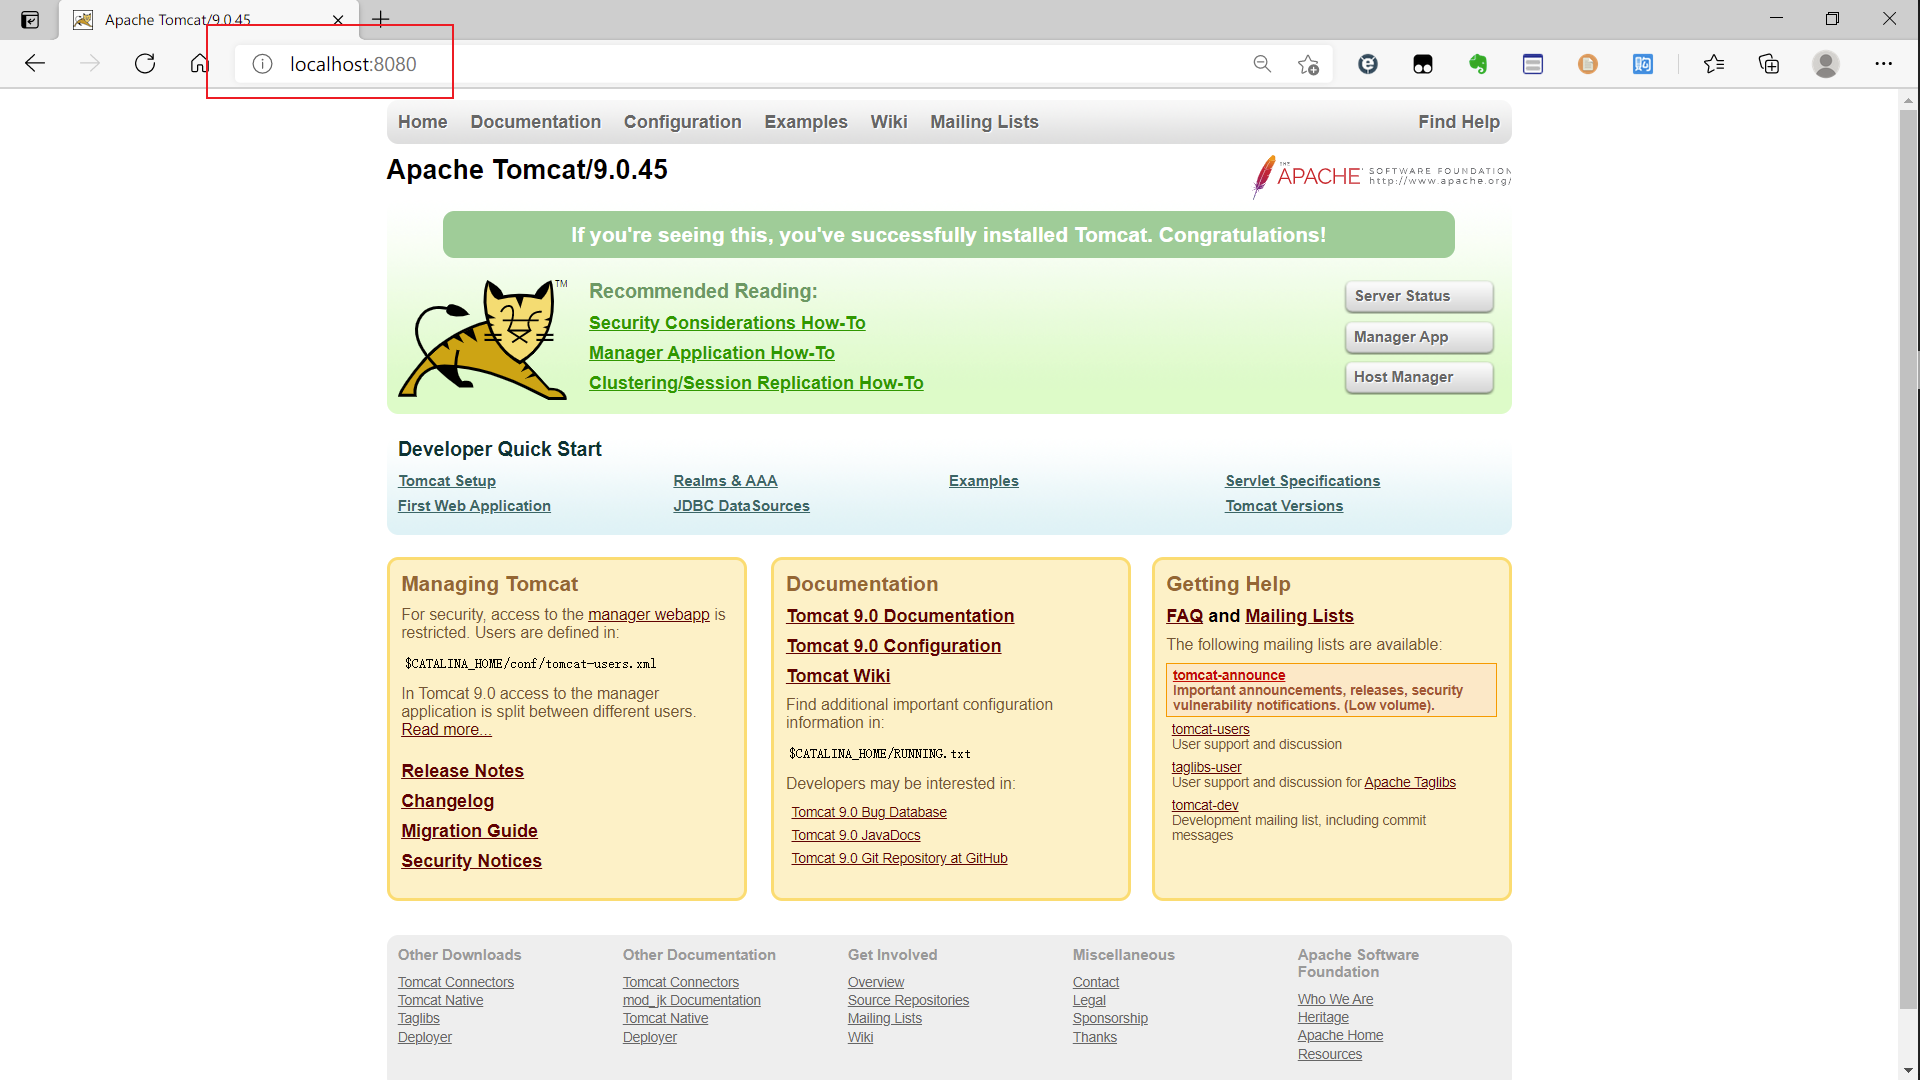
我们去到tomcat的根目录下的webapps文件夹,创建一个文件夹,在里面写一些文件,再在浏览器输入8080(tomcat默认端口)访问这些文件,实现模拟资源的访问。

首先打开的是tomcat的主页,主页资源可以在webapps里找到:
接着访问我们的资源:

可以看到,资源成功访问,不过是乱码的,这就交给你自己去配置了~
UDP
发短信:不用来连接,需要知道对方地址
消息发送端
1
2
3
4
5
6
7
8
9
10
11
12
13
14
15
16
17
18
19
20
21
22
23
24
25
26
27
28
29
30
31
32
| package com.everweekup.Net.Udp;
import java.net.DatagramPacket;
import java.net.DatagramSocket;
import java.net.InetAddress;
import java.net.SocketException;
import java.nio.charset.StandardCharsets;
public class UdpClientDemo01 {
public static void main(String[] args) throws Exception {
DatagramSocket socket = new DatagramSocket();
InetAddress localhost = InetAddress.getByName("localhost");
int port = 9090;
String message = "你好,服务器";
DatagramPacket packet = new DatagramPacket(message.getBytes(), 0, message.getBytes().length, localhost, port);
socket.send(packet);
}
}
|
消息接收端
1
2
3
4
5
6
7
8
9
10
11
12
13
14
15
16
17
18
19
20
21
22
23
24
25
| package com.everweekup.Net.Udp;
import java.net.DatagramPacket;
import java.net.DatagramSocket;
import java.net.SocketException;
public class UdpServerDemo01 {
public static void main(String[] args) throws Exception {
DatagramSocket socket = new DatagramSocket(9090);
byte[] buffer = new byte[1024];
DatagramPacket packet = new DatagramPacket(buffer, 0, buffer.length);
socket.receive(packet);
System.out.println(packet.getAddress().getHostAddress());
System.out.println(new String (packet.getData(), 0, packet.getLength()));
}
}
|
UDP聊天实现
咨询
循环发送
1
2
3
4
5
6
7
8
9
10
11
12
13
14
15
16
17
18
19
20
21
22
23
24
25
26
27
28
29
30
31
32
33
34
| package com.everweekup.Net.Udp.Chat;
import java.io.BufferedReader;
import java.io.InputStreamReader;
import java.net.DatagramPacket;
import java.net.DatagramSocket;
import java.net.InetSocketAddress;
import java.net.SocketException;
public class UdpSenderDemo01 {
public static void main(String[] args) throws Exception {
DatagramSocket socket = new DatagramSocket(8888);
BufferedReader reader = new BufferedReader(new InputStreamReader(System.in));
while (true){
String data = reader.readLine();
byte[] datas = data.getBytes();
DatagramPacket packet = new DatagramPacket(datas, 0, datas.length, new InetSocketAddress("localhost", 6666));
socket.send(packet);
if (data.equals("bye")){
break;
}
}
socket.close();
}
}
|
循环接收
1
2
3
4
5
6
7
8
9
10
11
12
13
14
15
16
17
18
19
20
21
22
23
24
25
26
27
28
29
30
| package com.everweekup.Net.Udp.Chat;
import java.net.DatagramPacket;
import java.net.DatagramSocket;
import java.net.SocketException;
public class UdpReceiverDemo01 {
public static void main(String[] args) throws Exception {
DatagramSocket socket = new DatagramSocket(6666);
while (true) {
byte[] container = new byte[1024];
DatagramPacket packet = new DatagramPacket(container, 0, container.length);
socket.receive(packet);
byte[] data = packet.getData();
String receiveData = new String(data, 0, data.length);
System.out.println(receiveData);
if (receiveData.equals("bye")){
break;
}
}
socket.close();
}
}
|
思考:为什么最后输入“bye”,receiver程序仍不会停止呢?
UDP多线程在线咨询
在线咨询:两个人都可以式发送方或者接收方
首先,先创建两个线程,一个send线程,一个receive线程:
send线程代码:
1
2
3
4
5
6
7
8
9
10
11
12
13
14
15
16
17
18
19
20
21
22
23
24
25
26
27
28
29
30
31
32
33
34
35
36
37
38
39
40
41
42
43
44
45
46
47
48
49
50
51
52
53
54
55
56
57
58
59
60
61
| package com.everweekup.Net.Udp.Chat;
import java.io.BufferedReader;
import java.io.InputStreamReader;
import java.net.DatagramPacket;
import java.net.DatagramSocket;
import java.net.InetSocketAddress;
import java.net.SocketException;
public class TalkSend implements Runnable{
DatagramSocket socket = null;
BufferedReader reader = null;
private int fromPort;
private String toIP;
private int toPort;
public TalkSend(int fromPort, String toIP, int toPort) {
this.fromPort = fromPort;
this.toIP = toIP;
this.toPort = toPort;
try {
socket = new DatagramSocket(this.fromPort);
reader = new BufferedReader(new InputStreamReader(System.in));
} catch (SocketException e) {
e.printStackTrace();
}
}
@Override
public void run() {
while (true){
try{
String data = reader.readLine();
byte[] datas = data.getBytes();
DatagramPacket packet = new DatagramPacket(datas, 0, datas.length, new InetSocketAddress(this.toIP, this.toPort));
socket.send(packet);
if (data.equals("bye")){
break; }
}catch(Exception e){
e.printStackTrace();
}
}
socket.close();
}
}
|
receive线程代码:
1
2
3
4
5
6
7
8
9
10
11
12
13
14
15
16
17
18
19
20
21
22
23
24
25
26
27
28
29
30
31
32
33
34
35
36
37
38
39
40
41
42
43
44
45
46
47
48
49
50
51
52
53
54
55
56
57
58
59
60
61
| package com.everweekup.Net.Udp.Chat;
import java.io.IOException;
import java.net.DatagramPacket;
import java.net.DatagramSocket;
import java.net.SocketException;
public class TalkReceiverDemo01 implements Runnable {
DatagramSocket socket = null;
private int port;
private String msgFrom;
public TalkReceiverDemo01(int port, String msgFrom) {
this.port = port;
this.msgFrom = msgFrom;
try {
socket = new DatagramSocket(this.port);
} catch (SocketException e) {
e.printStackTrace();
}
}
@Override
public void run() {
while (true) {
try {
byte[] container = new byte[1024];
DatagramPacket packet = new DatagramPacket(container, 0, container.length);
socket.receive(packet);
byte[] data = packet.getData();
System.out.println("接收空间长度"+data.length);
System.out.println("实际接收的数据长度"+packet.getLength());
String receiveData = new String(data, 0, packet.getLength());
System.out.println(this.msgFrom+":"+receiveData);
if (receiveData.equals("bye")){
System.out.println("收到!");
break;
}
} catch (IOException e) {
e.printStackTrace();
}
}
socket.close();
}
}
|
接下来就是开始多线程,创建Student和Teacher对象,各自分别启动两个线程,实现对话:
Student:
1
2
3
4
5
6
7
8
9
| package com.everweekup.Net.Udp.Chat;
public class TalkStudent {
public static void main(String[] args) {
new Thread(new TalkSend(7777, "localhost", 9999)).start();
new Thread(new TalkReceiverDemo01(8888, "老师")).start();
}
}
|
Teacher:
1
2
3
4
5
6
7
8
| package com.everweekup.Net.Udp.Chat;
public class TalkTeacher {
public static void main(String[] args) {
new Thread(new TalkSend(5555, "localhost", 8888)).start();
new Thread(new TalkReceiverDemo01(9999, "学生")).start();
}
}
|
URL
统一资源定位符:用于定位资源,定位互联网上的某个资源
1
| 协议://ip地址:端口//项目名/资源 # 可以少,但是不能多
|
1
2
3
4
5
6
7
8
9
10
11
12
13
14
15
16
17
18
19
20
21
22
23
24
25
| package com.everweekup.Net.Url;
import java.net.MalformedURLException;
import java.net.URL;
public class URLDemo01 {
public static void main(String[] args) throws MalformedURLException {
URL url = new URL("http://localhost:8080/helloworld/index.jsp?username=hj&password=123");
System.out.println(url.getProtocol());
System.out.println(url.getHost());
System.out.println(url.getPort());
System.out.println(url.getPath());
System.out.println(url.getFile());
System.out.println(url.getQuery());
}
}
|
参考链接
https://blog.51cto.com/yanjiu/2149866
https://www.kuangstudy.com/