FlinkCDC 简介 CDC 是 Change Data Capture(变更数据获取)的简称。核心思想是,监测并捕获数据库的变动(binlog)(包括数据或数据表的插入、更新以及删除等),将这些变更按发生的顺序完整记录下来,写入到消息中间件中以供其他服务进行订阅及消费。
CDC种类
基于查询的 CDC
基于Binlog 的 CDC
开源产品
Sqoop、Kafka JDBC Source
Canal、Maxwell、Debezium
执行模式
Batch
Streaming
是否可以捕获所有数据变化
否
是
延迟性
高延迟
低延迟
是否增加数据库压力
是
否
基于查询的数据都是快照,只能拿到多次变化的数据当前变化的快照。而基于Binlog的可以捕获所有的数据状态。
基于查询的是需要通过mysql服务拿数据,而基于Binlog是获取权限后可以直接到磁盘拿数据,不需要使用mysql服务。
但是通过Binlog难以处理每日全量的数据,因为基于Binlog的CDC获取的是流数据。
Flink-CDC Flink 社区开发了 flink-cdc-connectors 组件(阿里的云邪大佬开发的),这是一个可以直接从 MySQL、PostgreSQL 等数据库直接读取全量数据和增量变更数据的 source 组件。目前也已开源,开源地址: https://github.com/ververica/flink-cdc-connectors,该组件并没有合并到Flink官方中去。
FlinkCDC底层整合了Debezium 。
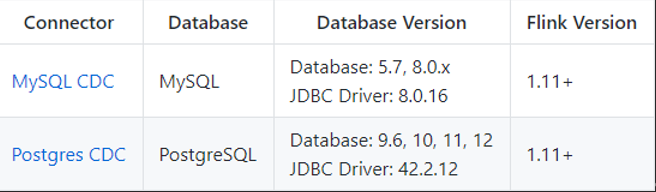
FlinkCDC文档
由简介可以看到,FlinkCDC可以直接从数据库拿数据进行处理,比其他基于Binlog的CDC更加便捷。(binlog->Canal->Kafka->Flink)
(1.12Flink—1.2FlinkCDC)
Flink配置 参考下面链接的Standalone Cluster部署:
Flink部署 | Jabari (everweekup.com)
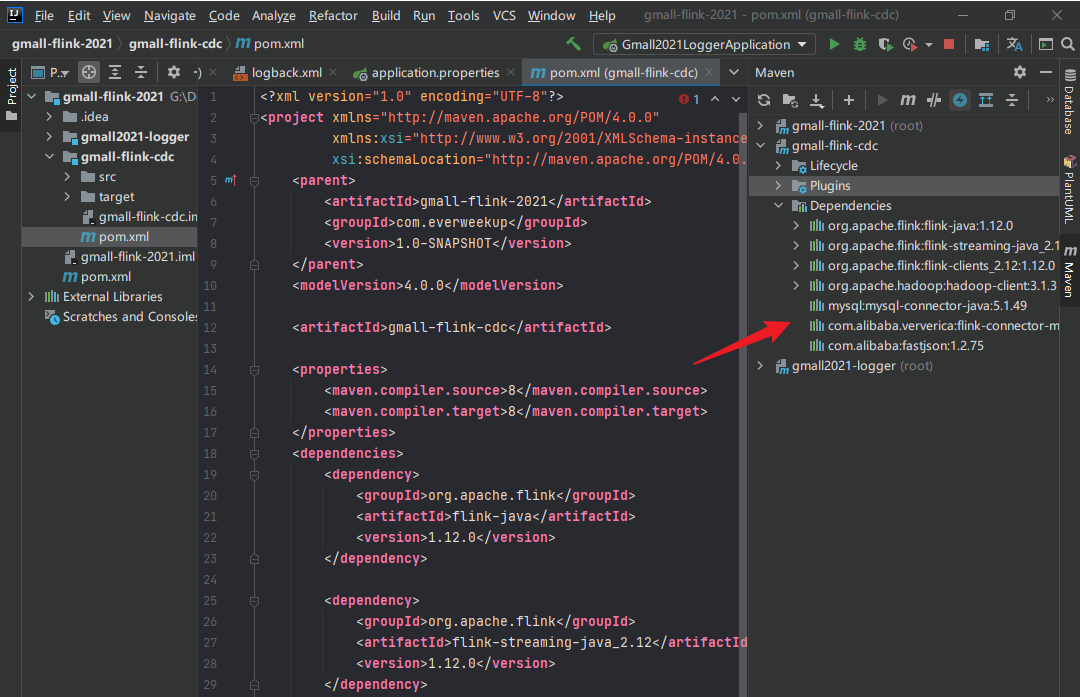
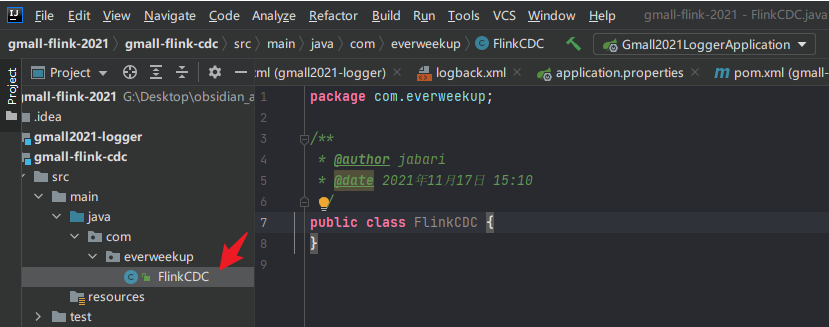
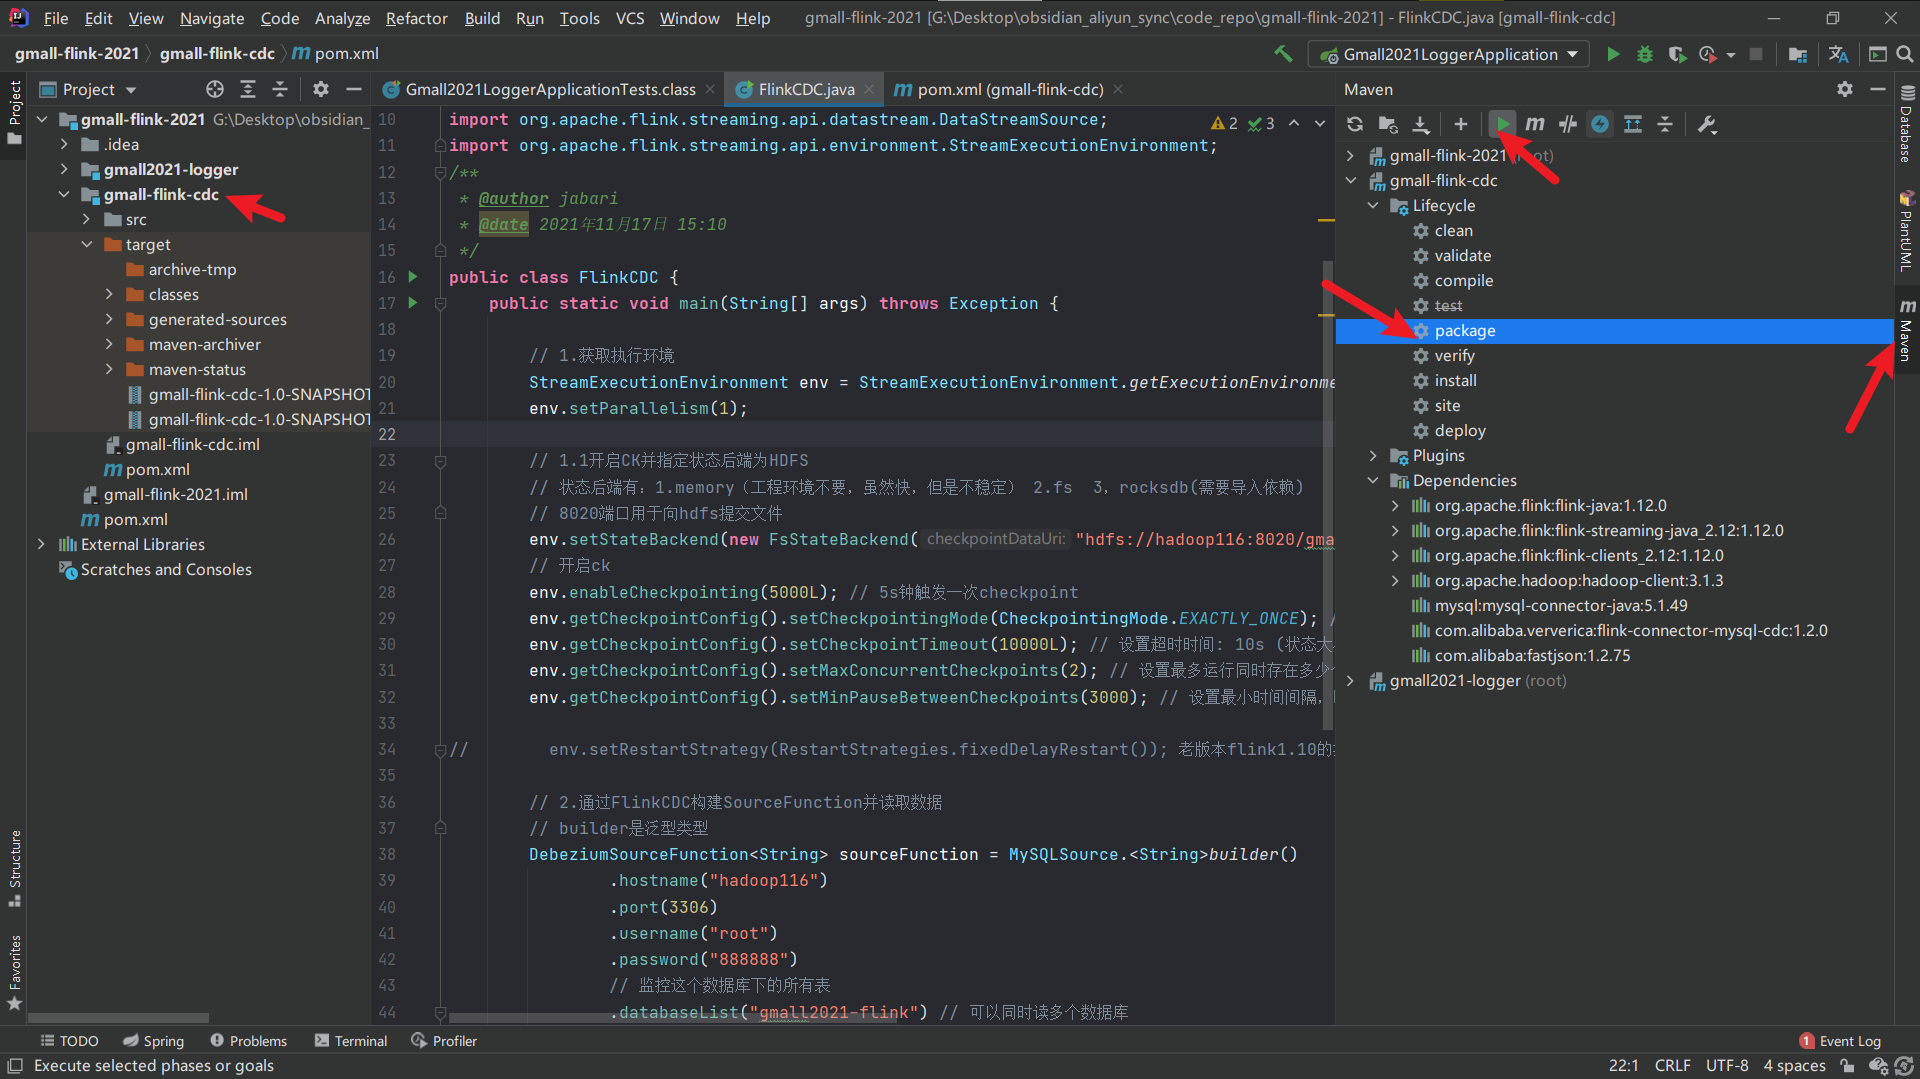
案例 DataStream应用方式 1.先创建一个FlinkCDC的Maven工程
2.需要配置pom.xml
1 2 3 4 5 6 7 8 9 10 11 12 13 14 15 16 17 18 19 20 21 22 23 24 25 26 27 28 29 30 31 32 33 34 35 36 37 38 39 40 41 42 43 44 45 46 47 48 49 50 51 52 53 54 55 56 57 58 59 60 61 62 63 64 65 66 67 68 69 70 71 72 <dependencies > <dependency > <groupId > org.apache.flink</groupId > <artifactId > flink-java</artifactId > <version > 1.12.0</version > </dependency > <dependency > <groupId > org.apache.flink</groupId > <artifactId > flink-streaming-java_2.12</artifactId > <version > 1.12.0</version > </dependency > <dependency > <groupId > org.apache.flink</groupId > <artifactId > flink-clients_2.12</artifactId > <version > 1.12.0</version > </dependency > <dependency > <groupId > org.apache.hadoop</groupId > <artifactId > hadoop-client</artifactId > <version > 3.1.3</version > </dependency > <dependency > <groupId > mysql</groupId > <artifactId > mysql-connector-java</artifactId > <version > 5.1.49</version > </dependency > <dependency > <groupId > com.alibaba.ververica</groupId > <artifactId > flink-connector-mysql-cdc</artifactId > <version > 1.2.0</version > </dependency > <dependency > <groupId > com.alibaba</groupId > <artifactId > fastjson</artifactId > <version > 1.2.75</version > </dependency > </dependencies > <build > <plugins > <plugin > <groupId > org.apache.maven.plugins</groupId > <artifactId > maven-assembly-plugin</artifactId > <version > 3.0.0</version > <configuration > <descriptorRefs > <descriptorRef > jar-with-dependencies</descriptorRef > </descriptorRefs > </configuration > <executions > <execution > <id > make-assembly</id > <phase > package</phase > <goals > <goal > single</goal > </goals > </execution > </executions > </plugin > </plugins > </build >
3.要使用FlinkCDC有两种方式:
将对应包导入到Flink根目录下的lib目录中
将FlinkCDC包一起打成jar包上传
这里我们通过打jar包的形式使用。
4.Maven下载工程文件
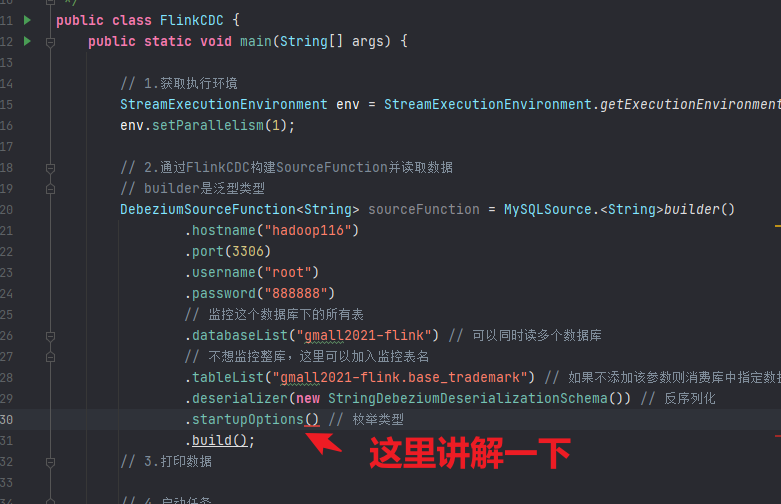
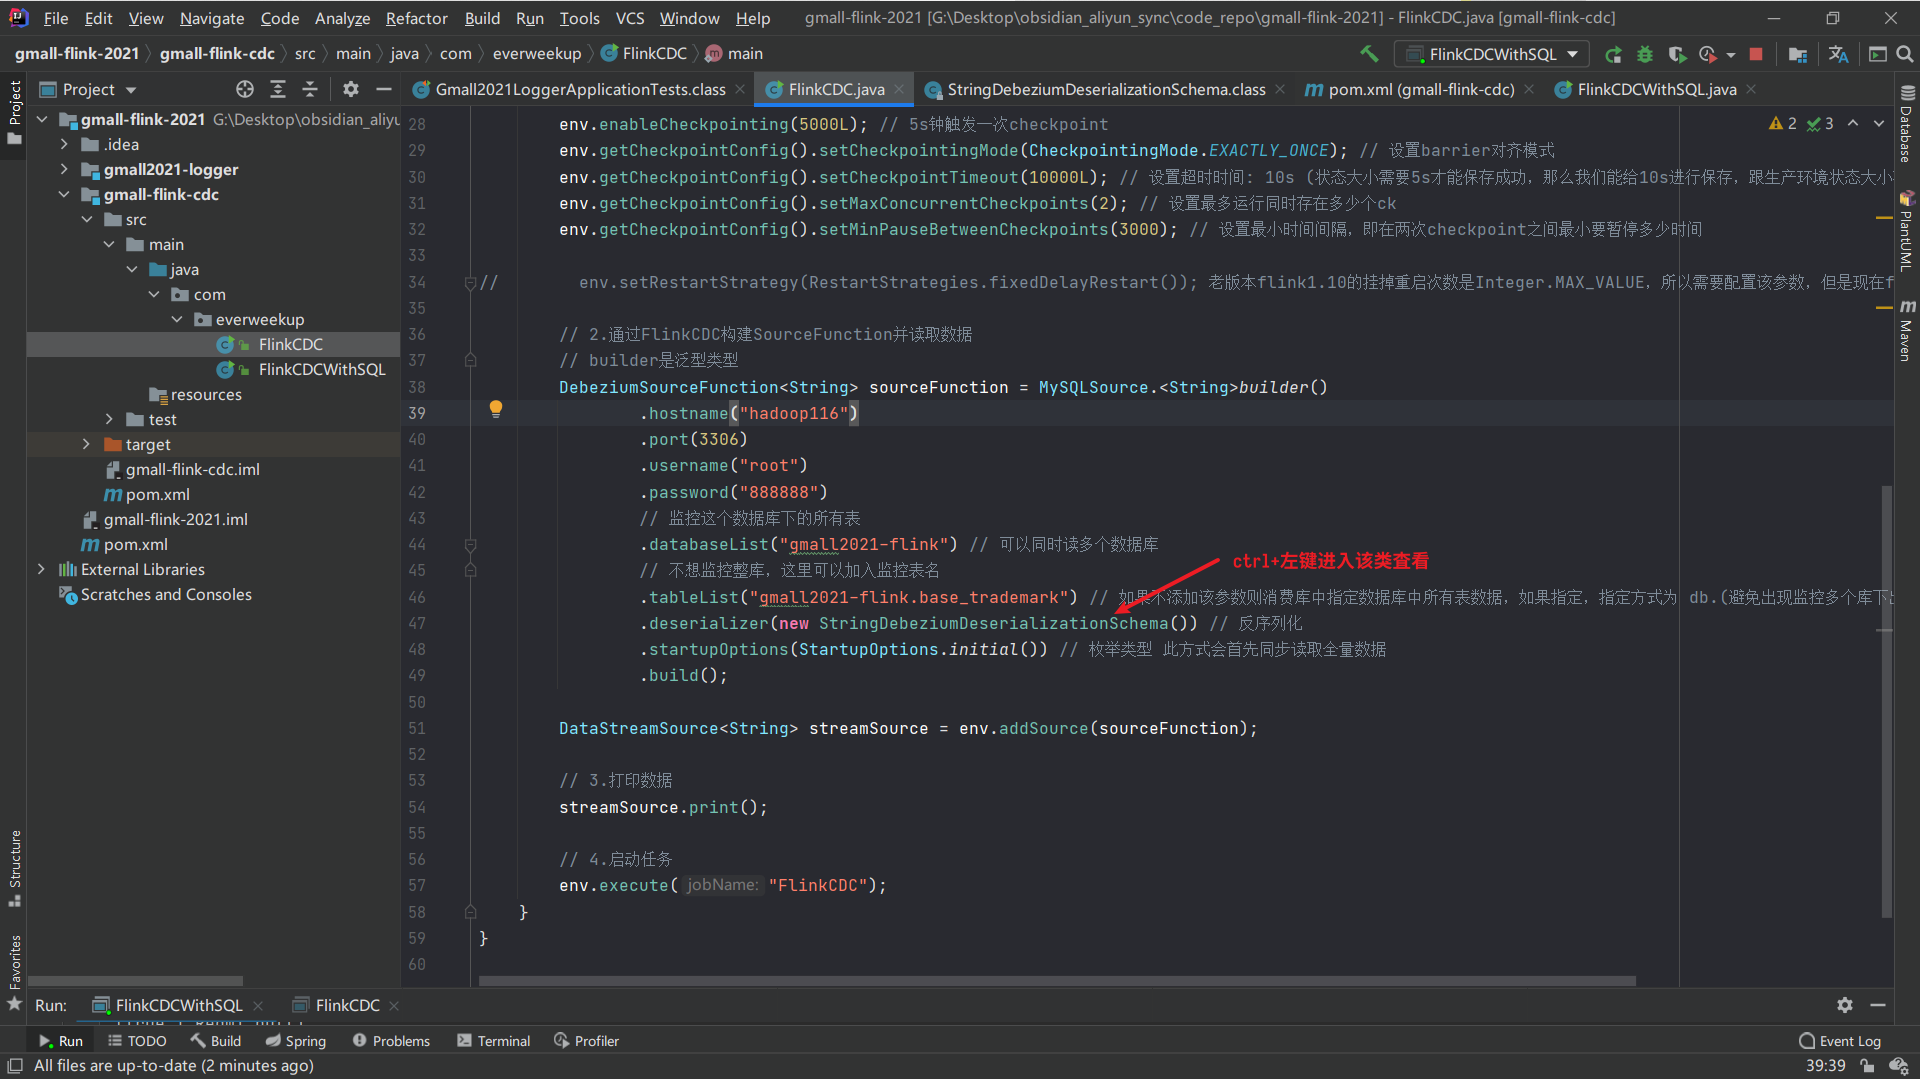
5.编写FlinkCDC代码
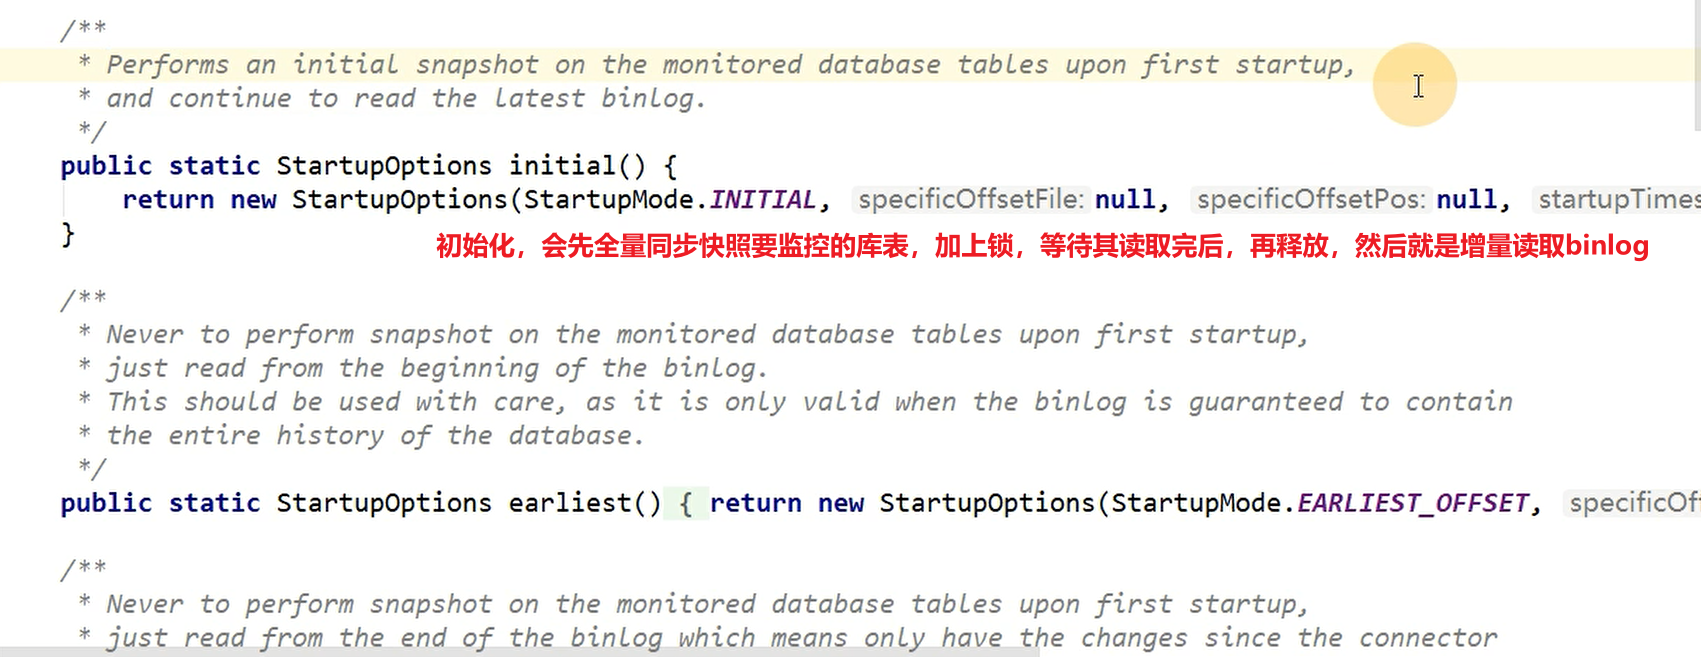
读取数据方式: 这个startupOptions是一个枚举类型,用于配置开始读取数据的方式:
initial:
此方式会先全量加锁备份,读取完毕后再释放,保证数据一致性。
会牺牲一定性能,但是可以提升准确性。也可以不加锁,降低一部分准确性来提升性能。
earliest:
此方式不会在启动时对数据库表创建快照锁。
要使用earliest需要先配置binlog(vim /etc/my.cnf),先指定好数据库,然后再去创建数据库表,才能使用此方式。此方式必须读到建表语句,要包含完整的binlog。
latest:
只获取连接被启动后,这一刻开始你有新的数据,才读取过来。
offset:
binlog有自己的offset,可以指定binlog的offset,从那个位置开始读取binlog的内容。
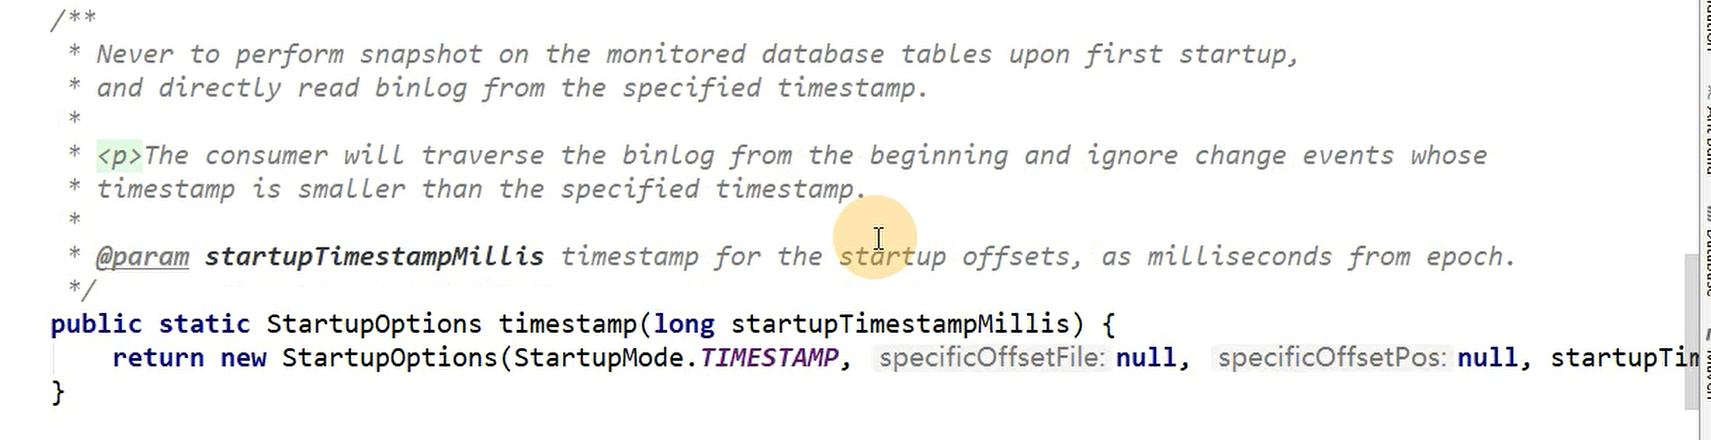
timestamp:
指定时间戳,binlog除了offset文件,每一条数据都有自己的时间戳,可以指定某段时间的数据。从>=指定时间戳的时间开始读。
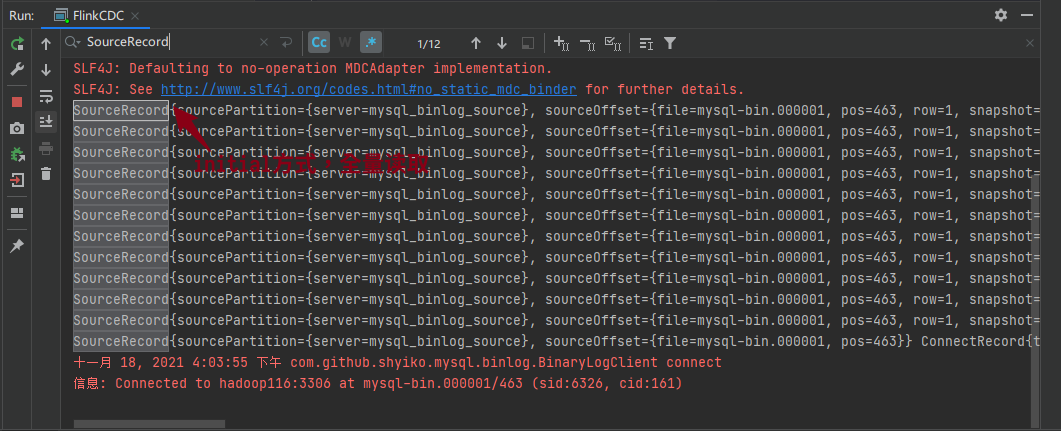
代码编写及运行测试: 1 2 3 4 5 6 7 8 9 10 11 12 13 14 15 16 17 18 19 20 21 22 23 24 25 26 27 28 29 30 31 32 33 34 35 36 37 38 39 40 41 42 43 package com.everweekup;import com.alibaba.ververica.cdc.connectors.mysql.MySQLSource;import com.alibaba.ververica.cdc.connectors.mysql.table.StartupOptions;import com.alibaba.ververica.cdc.debezium.DebeziumSourceFunction;import com.alibaba.ververica.cdc.debezium.StringDebeziumDeserializationSchema;import org.apache.flink.streaming.api.datastream.DataStreamSource;import org.apache.flink.streaming.api.environment.StreamExecutionEnvironment;public class FlinkCDC { public static void main (String[] args) throws Exception { StreamExecutionEnvironment env = StreamExecutionEnvironment.getExecutionEnvironment(); env.setParallelism(1 ); DebeziumSourceFunction<String> sourceFunction = MySQLSource.<String>builder() .hostname("hadoop116" ) .port(3306 ) .username("root" ) .password("888888" ) .databaseList("gmall2021-flink" ) .tableList("gmall2021-flink.base_trademark" ) .deserializer(new StringDebeziumDeserializationSchema ()) .startupOptions(StartupOptions.initial()) .build(); DataStreamSource<String> streamSource = env.addSource(sourceFunction); streamSource.print(); env.execute("FlinkCDC" ); } }
查看输出的结果:
读取到的数据对应数据库全量记录数12条。
读取到mysql binlog最近的记录:mysql-bin.000001/463
检验数据库:
检验binlog:
1 2 3 4 (base) [dw@hadoop116 mysql]$ cd /var/lib/mysql (base) [dw@hadoop116 mysql]$ sudo ls -ll | grep mysql-bin -rw-r----- 1 mysql mysql 463 Nov 16 16:28 mysql-bin.000001<-- -rw-r----- 1 mysql mysql 19 Nov 16 16:24 mysql-bin.index
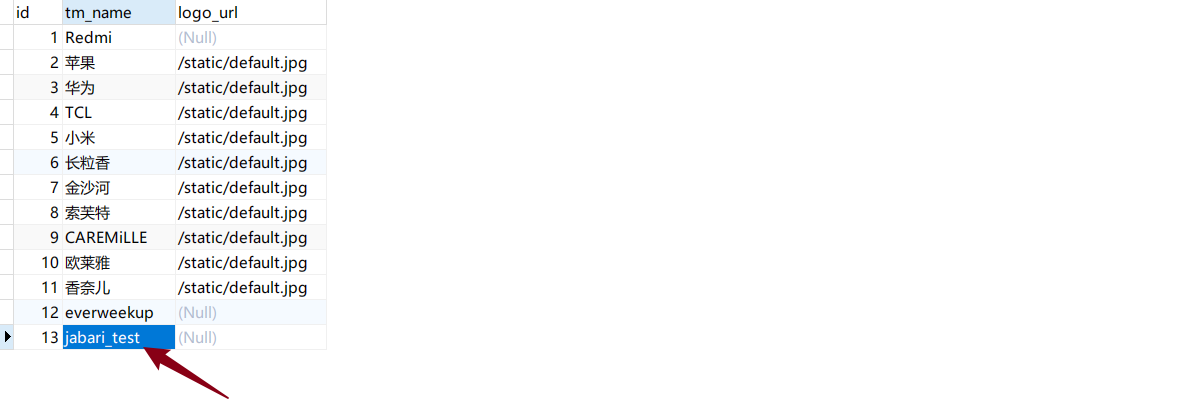
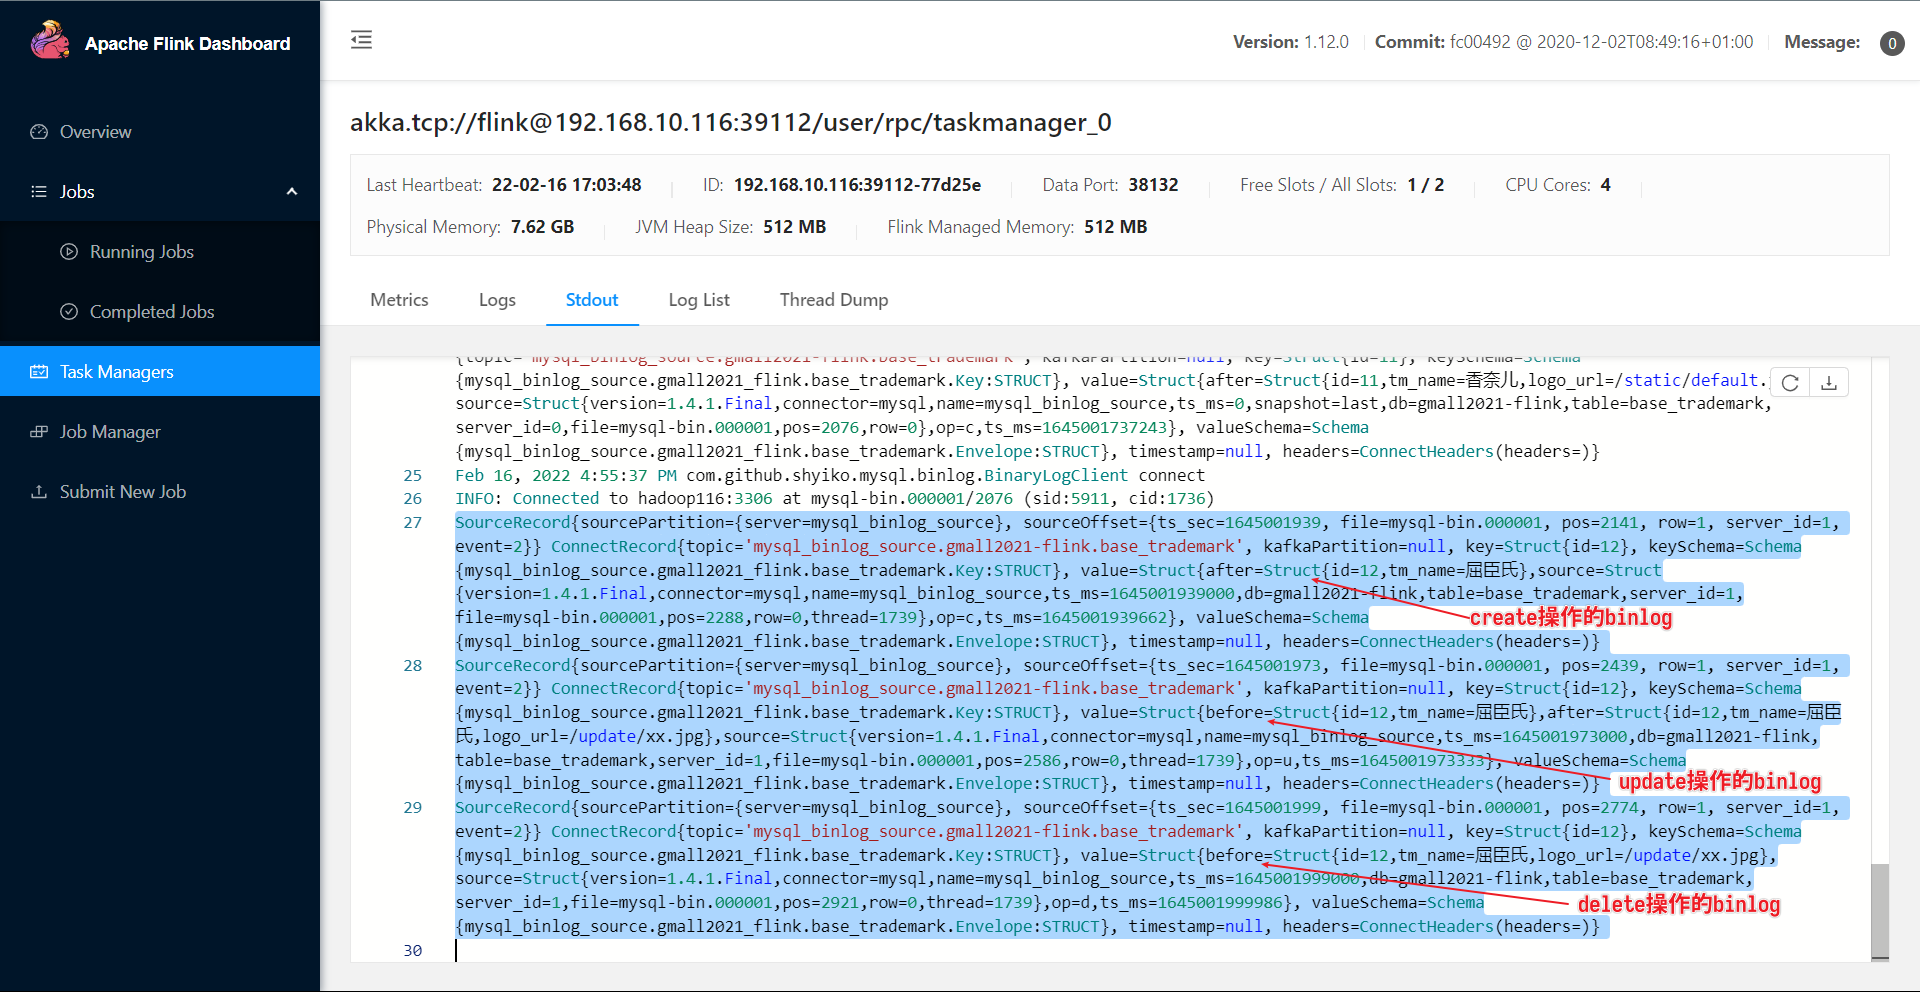
测试新增一条记录 测试新增一条记录,查看输出结果:
查看idea控制台输出:
同理,查看全量读取阶段的op,也是“c”。
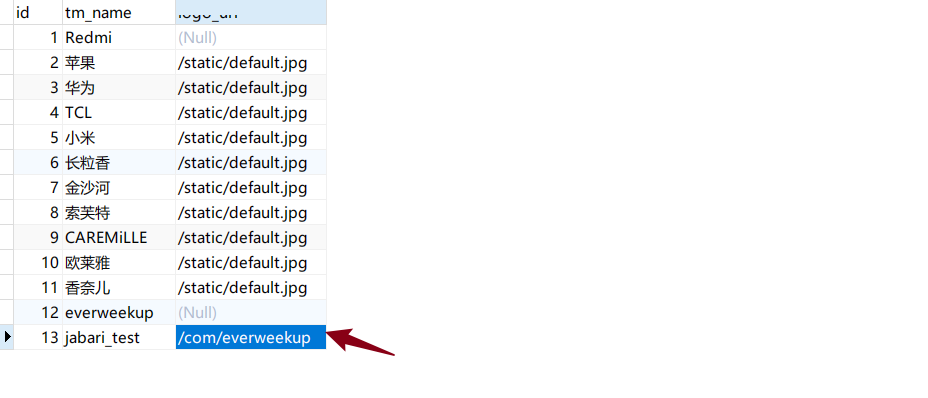
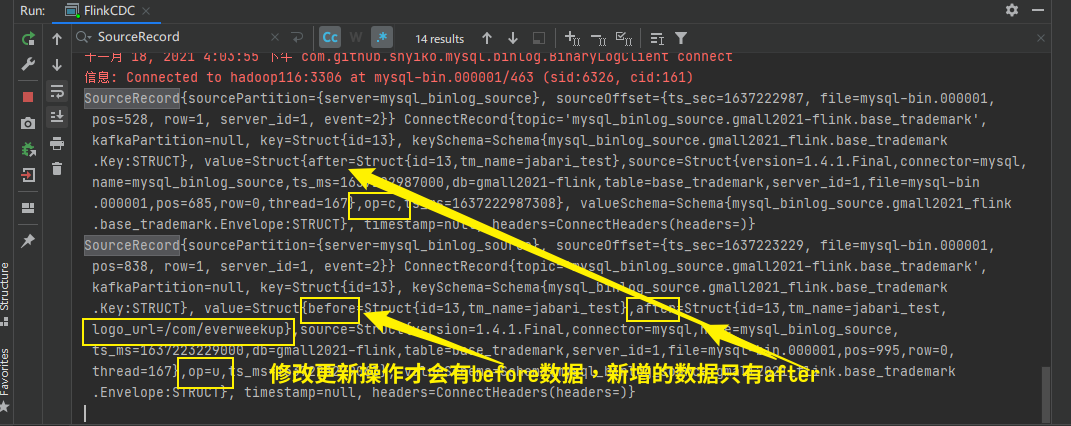
测试修改一条记录 修改更新一条数据:
查看控制台输出:
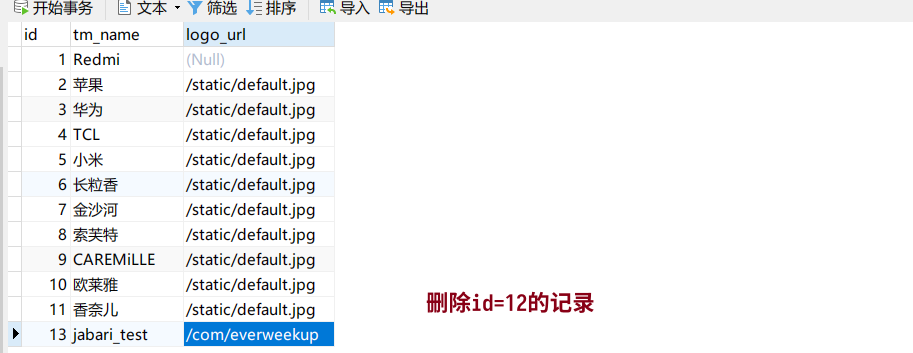
测试删除一条记录
查看控制台输出:
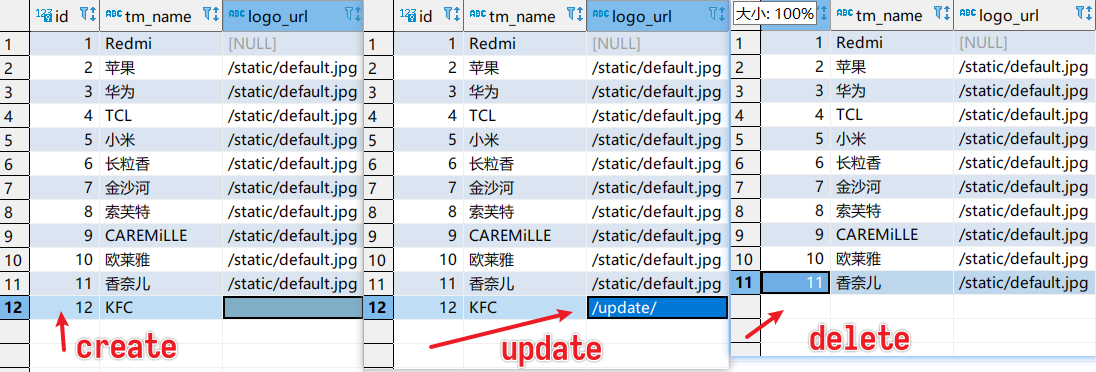
删除数据后after变before,且仅有before。
Initial方式重启测试 这里我们采用的是initial方式读取数据,根据上面读取方式的讲解中,该方法只有在第一次读取时才会全量打印当前时刻的数据,那么此时我们重新启动程序测试下,是否还会再次打印数据库全量数据呢?
可以看到,数据再次被重新全量打印。
这里需要分析“初始化”的概念。判断是否第一次启动,需要从状态去判断,有没保存状态,如果是从状态恢复的,那就是第二次了,如果不是从checkpoint或savepoint等保存的状态恢复的,那都叫第一次运行。
latest方式读取测试 可以看到,该方式确实直接从binlog最新记录开始读取。
1 2 3 (base) [dw@hadoop116 mysql]$ sudo ls -ll | grep mysql-bin -rw-r----- 1 mysql mysql 1432 Nov 18 16:16 mysql-bin.000001 -rw-r----- 1 mysql mysql 19 Nov 16 16:24 mysql-bin.index
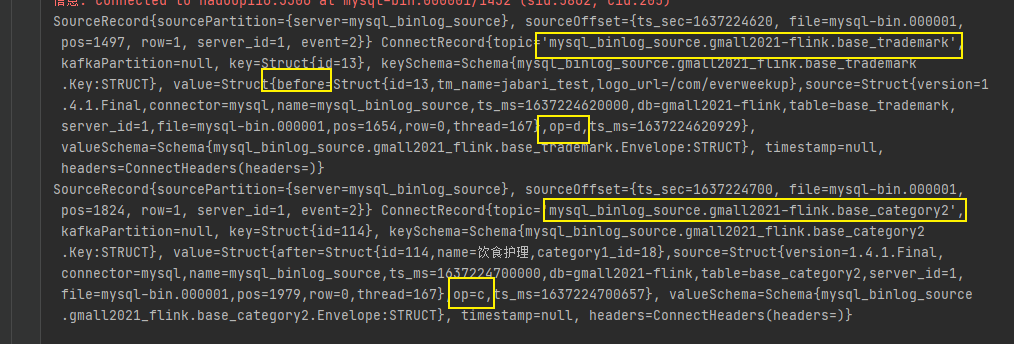
测试注释tableList属性 我们先前说过,tableList属性是指定读取某张表的,如果没有这个属性,则会默认将任一张表的变化的数据打印,这里用latest测试,因为initial打印数据会过多。
开始测试:
找张表,先删除一条:
再找另外一张表,加一条数据:
查看结果:
配置开启checkpoint 这里只截取了checkpoint配置块的代码,下面挑一些重要的开始详讲。
1 2 3 4 5 6 7 8 9 10 11 12 13 env.setStateBackend(new FsStateBackend ("hdfs://hadoop116:8020/gmall-flink-2021/ck" )) env.enableCheckpointing(5000 ); env.getCheckpointConfig().setCheckpointingMode(CheckpointingMode.EXACTLY_ONCE); env.getCheckpointConfig().setCheckpointTimeout(10000L ); env.getCheckpointConfig().setMaxConcurrentCheckpoints(2 ); env.getCheckpointConfig().setMinPauseBetweenCheckpoints(3000 );
setStateBackend 该参数用于配置checkpoint的状态后端,即用什么来保存状态。这里主要有三种方式,大家可以自行查阅这三种方式在什么情况下使用,怎么使用的:
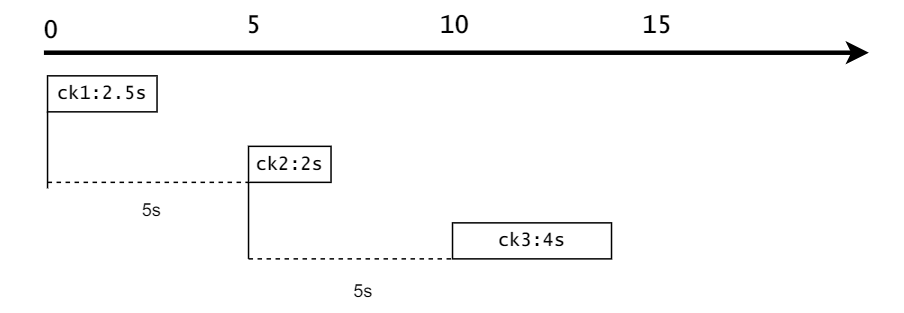
enableCheckpointing 该参数配置FlinkCDC开启checkpoint的时间间隔,是从两个checkpoint的头与头之间的时间。
setCheckpointTimeout 该参数配置的是checkpoint最长不能超过的时间。
setMaxConcurrentCheckpoints 该参数配置的是最多同时可以存在多少个checkpoint。结合前面的enableCheckpointing:5s和setCheckpointTimeout:10s来看:
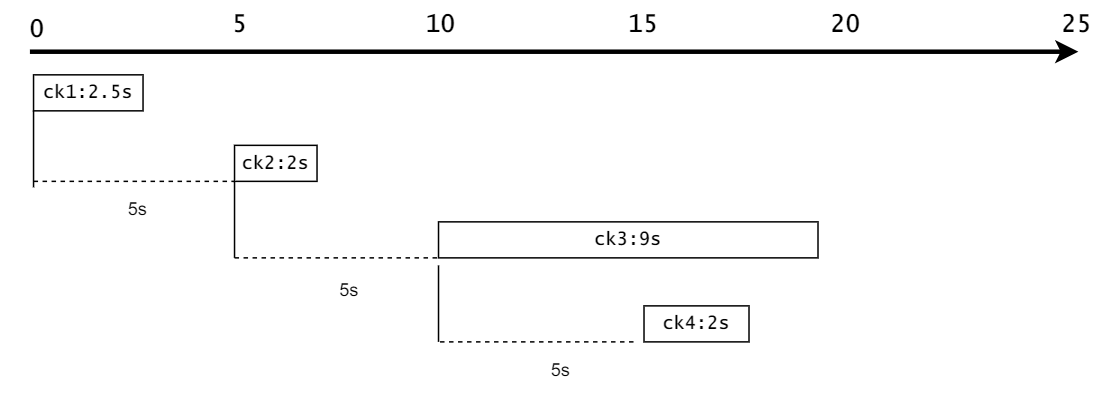
setMinPauseBetweenCheckpoints 该参数配置的是两次checkpoint最少要间隔多少时间。这里的间隔是指前面的ck的尾部和当前ck的头部间隔的时间。
setRestartStrategy 该参数是配置FlinkCDC挂掉后重启的策略 。
在老版本的Flink中,比如1.10版本,Flink的重启次数默认是Integer.MAX_VALUE(即整型的最大值),所以需要手动配置重启次数。不过如今的Flink该参数已经配置的很合理了,不再需要手动配置了。
DataStream-FlinkCDC测试 完整代码:
1 2 3 4 5 6 7 8 9 10 11 12 13 14 15 16 17 18 19 20 21 22 23 24 25 26 27 28 29 30 31 32 33 34 35 36 37 38 39 40 41 42 43 44 45 46 47 48 49 50 51 52 53 54 55 56 57 58 59 package com.everweekup;import com.alibaba.ververica.cdc.connectors.mysql.MySQLSource;import com.alibaba.ververica.cdc.connectors.mysql.table.StartupOptions;import com.alibaba.ververica.cdc.debezium.DebeziumSourceFunction;import com.alibaba.ververica.cdc.debezium.StringDebeziumDeserializationSchema;import org.apache.flink.api.common.restartstrategy.RestartStrategies;import org.apache.flink.runtime.state.filesystem.FsStateBackend;import org.apache.flink.streaming.api.CheckpointingMode;import org.apache.flink.streaming.api.datastream.DataStreamSource;import org.apache.flink.streaming.api.environment.StreamExecutionEnvironment;public class FlinkCDC { public static void main (String[] args) throws Exception { StreamExecutionEnvironment env = StreamExecutionEnvironment.getExecutionEnvironment(); env.setParallelism(1 ); env.setStateBackend(new FsStateBackend ("hdfs://hadoop116:8020/gmall-flink-2021/ck" )); env.enableCheckpointing(5000L ); env.getCheckpointConfig().setCheckpointingMode(CheckpointingMode.EXACTLY_ONCE); env.getCheckpointConfig().setCheckpointTimeout(10000L ); env.getCheckpointConfig().setMaxConcurrentCheckpoints(2 ); env.getCheckpointConfig().setMinPauseBetweenCheckpoints(3000 ); DebeziumSourceFunction<String> sourceFunction = MySQLSource.<String>builder() .hostname("hadoop116" ) .port(3306 ) .username("root" ) .password("888888" ) .databaseList("gmall2021-flink" ) .tableList("gmall2021-flink.base_trademark" ) .deserializer(new StringDebeziumDeserializationSchema ()) .startupOptions(StartupOptions.initial()) .build(); DataStreamSource<String> streamSource = env.addSource(sourceFunction); streamSource.print(); env.execute("FlinkCDC" ); } }
上传flinkcdc jar包 把编写好的FlinkCDC代码打成jar包,并上传到集群:
1 2 3 4 5 6 7 (base) [dw@hadoop116 flinkcdc]$ pwd /opt/module/gmall-flink/flinkcdc (base) [dw@hadoop116 flinkcdc]$ ls gmall-flink-cdc-1.0-SNAPSHOT-jar-with-dependencies.jar (base) [dw@hadoop116 flinkcdc]$ mv gmall-flink-cdc-1.0-SNAPSHOT-jar-with-dependencies.jar flink-cdc.jar (base) [dw@hadoop116 flinkcdc]$ ls flink-cdc.jar
运行flinkcdc程序 进入到flink的根目录,运行以下命令:(采用的是initial,第一次运行会将指定库表的所有binlog信息打印)
1 2 3 4 ./bin/flink run \ -m hadoop116:8081 \ -c com.everweekup.FlinkCDC \ /opt/module/gmall-flink/flinkcdc/flink-cdc.jar \
命令解释:
1 2 3 4 ./bin/flink run \ -m hadoop116:8081 \ # -m: 指定jobmanager来启动任务 -c com.everweekup.FlinkCDC \ # -c: 指定class /opt/module/gmall-flink/flinkcdc/flink-cdc.jar \ # jar包路径
运行命令后,终端输出提示信息:
1 Job has been submitted with JobID 51ced43e3b6257c38e63bab74ee40af7
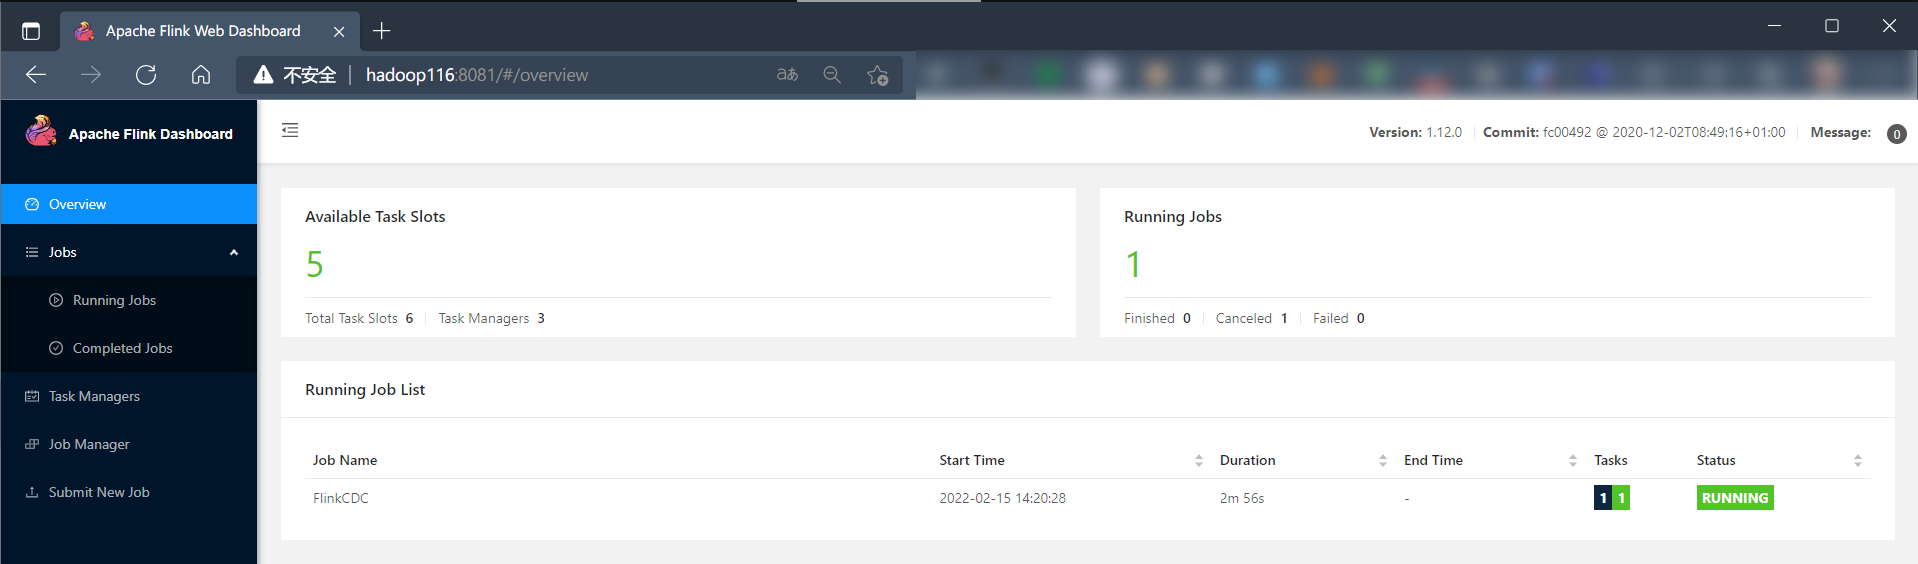
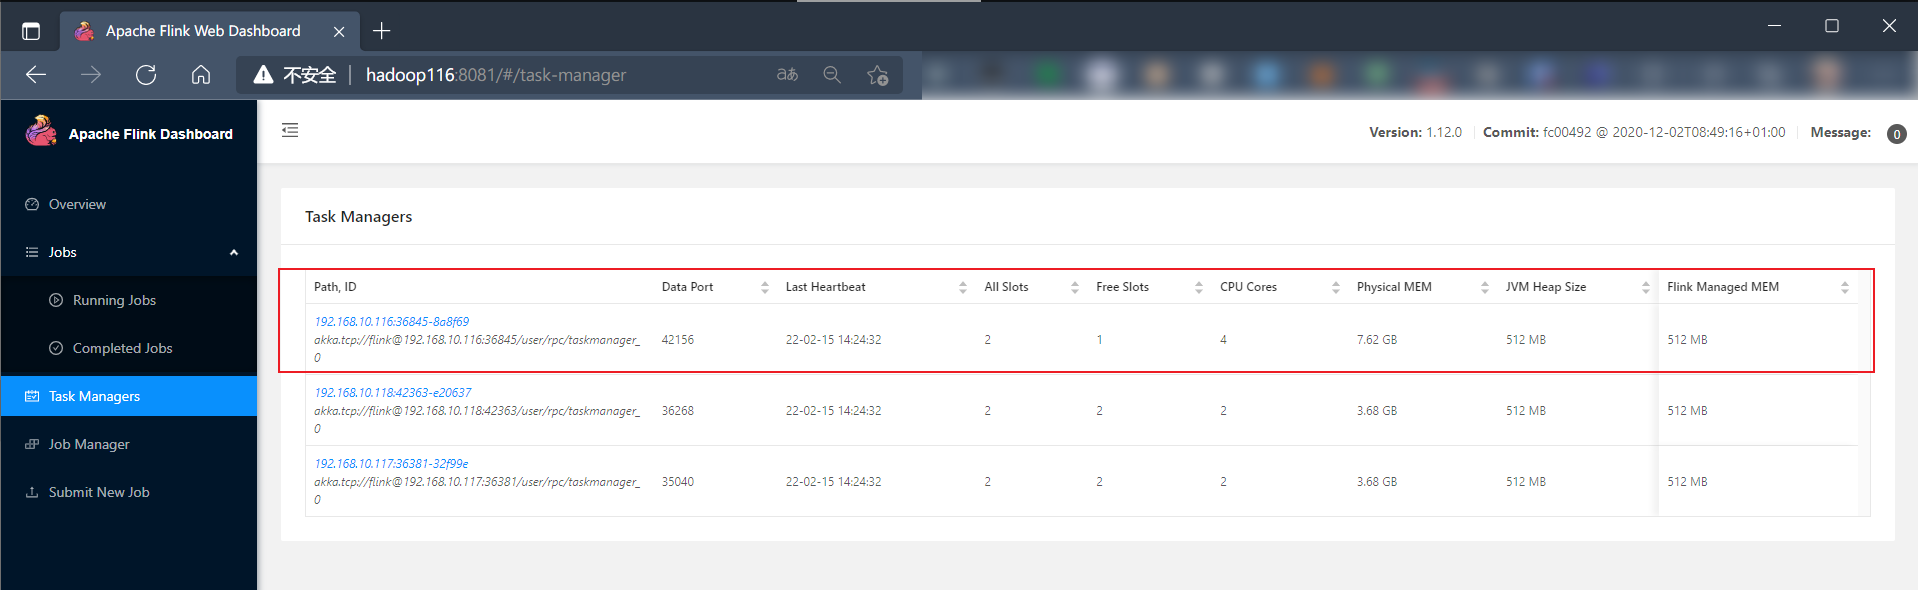
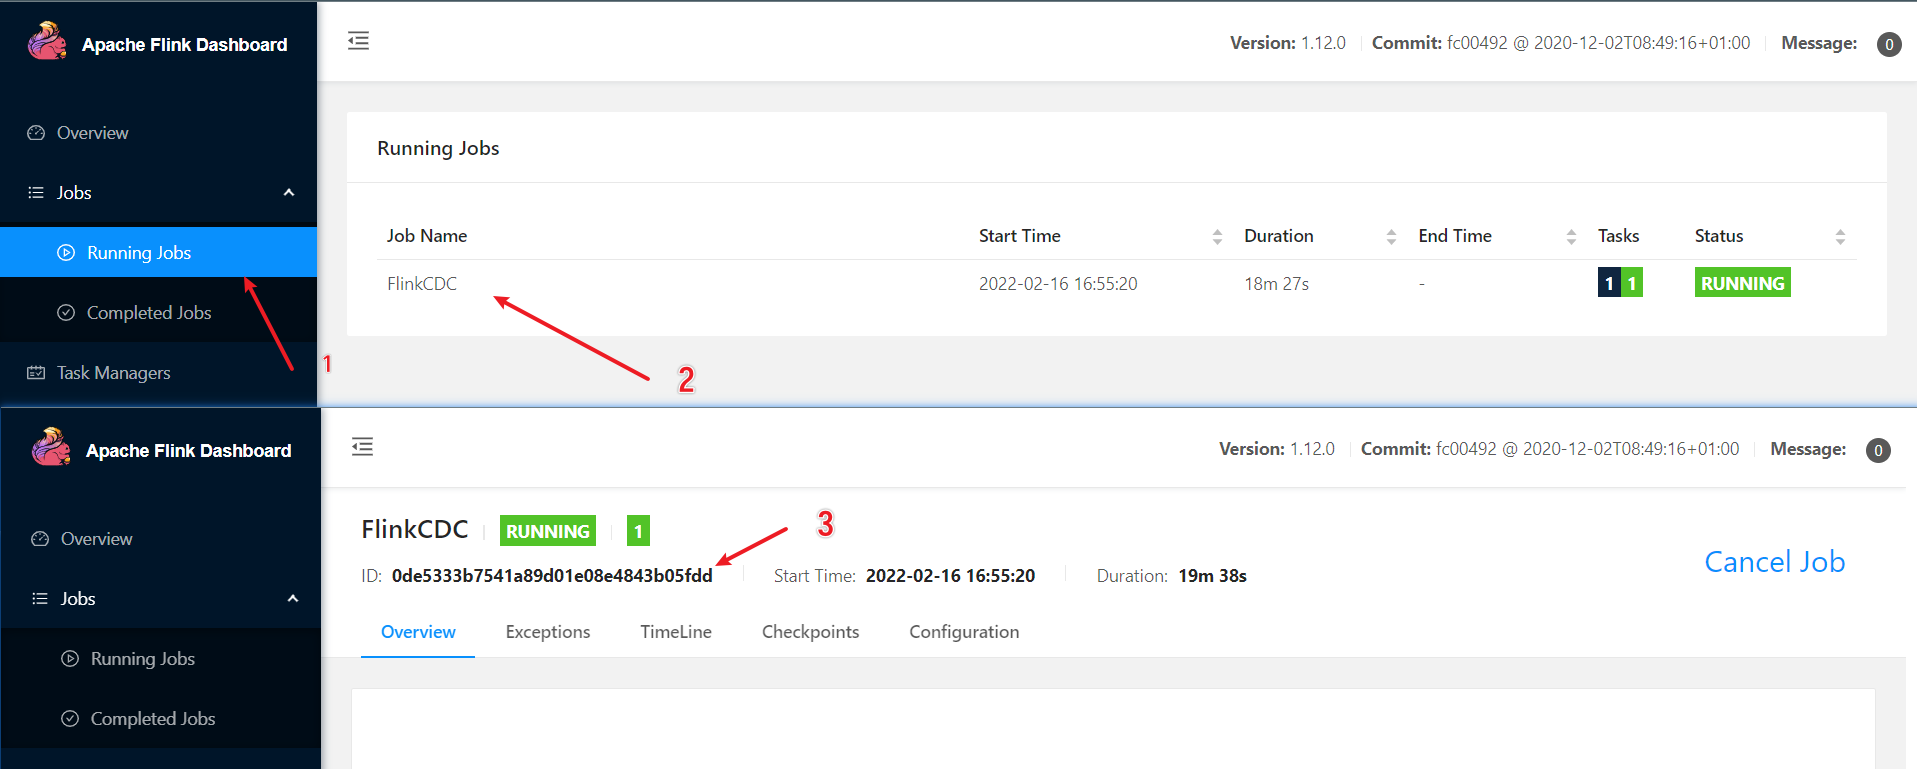
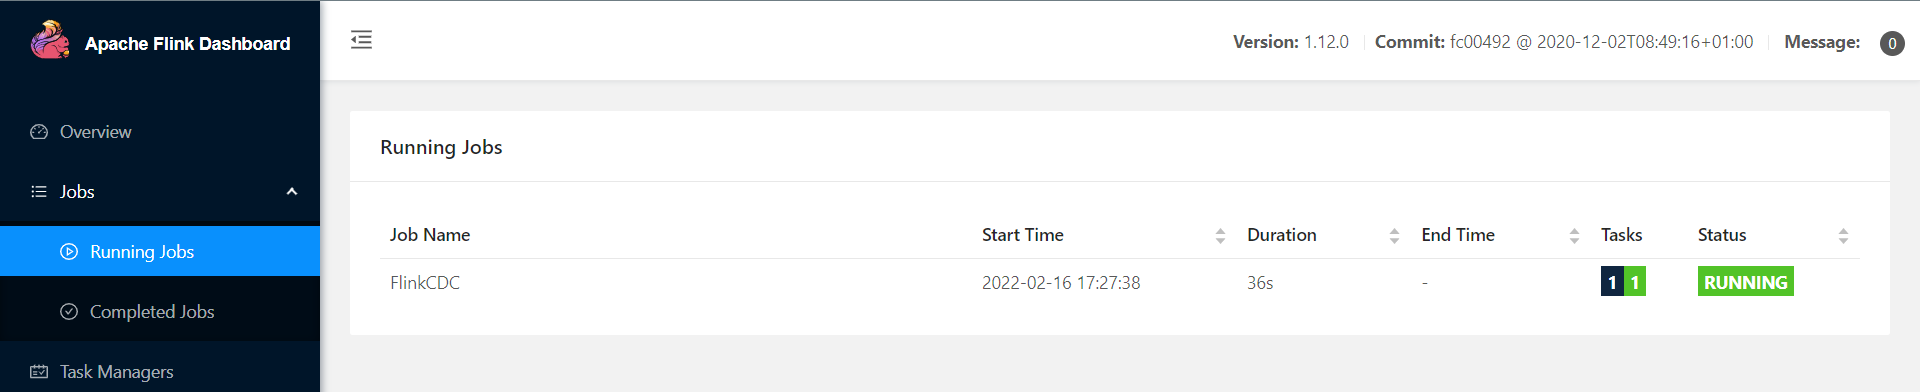
此时,打开flink的web页面查看:
查看TaskManager:
可以看到任务在指定的节点上运行占用了一个slot。
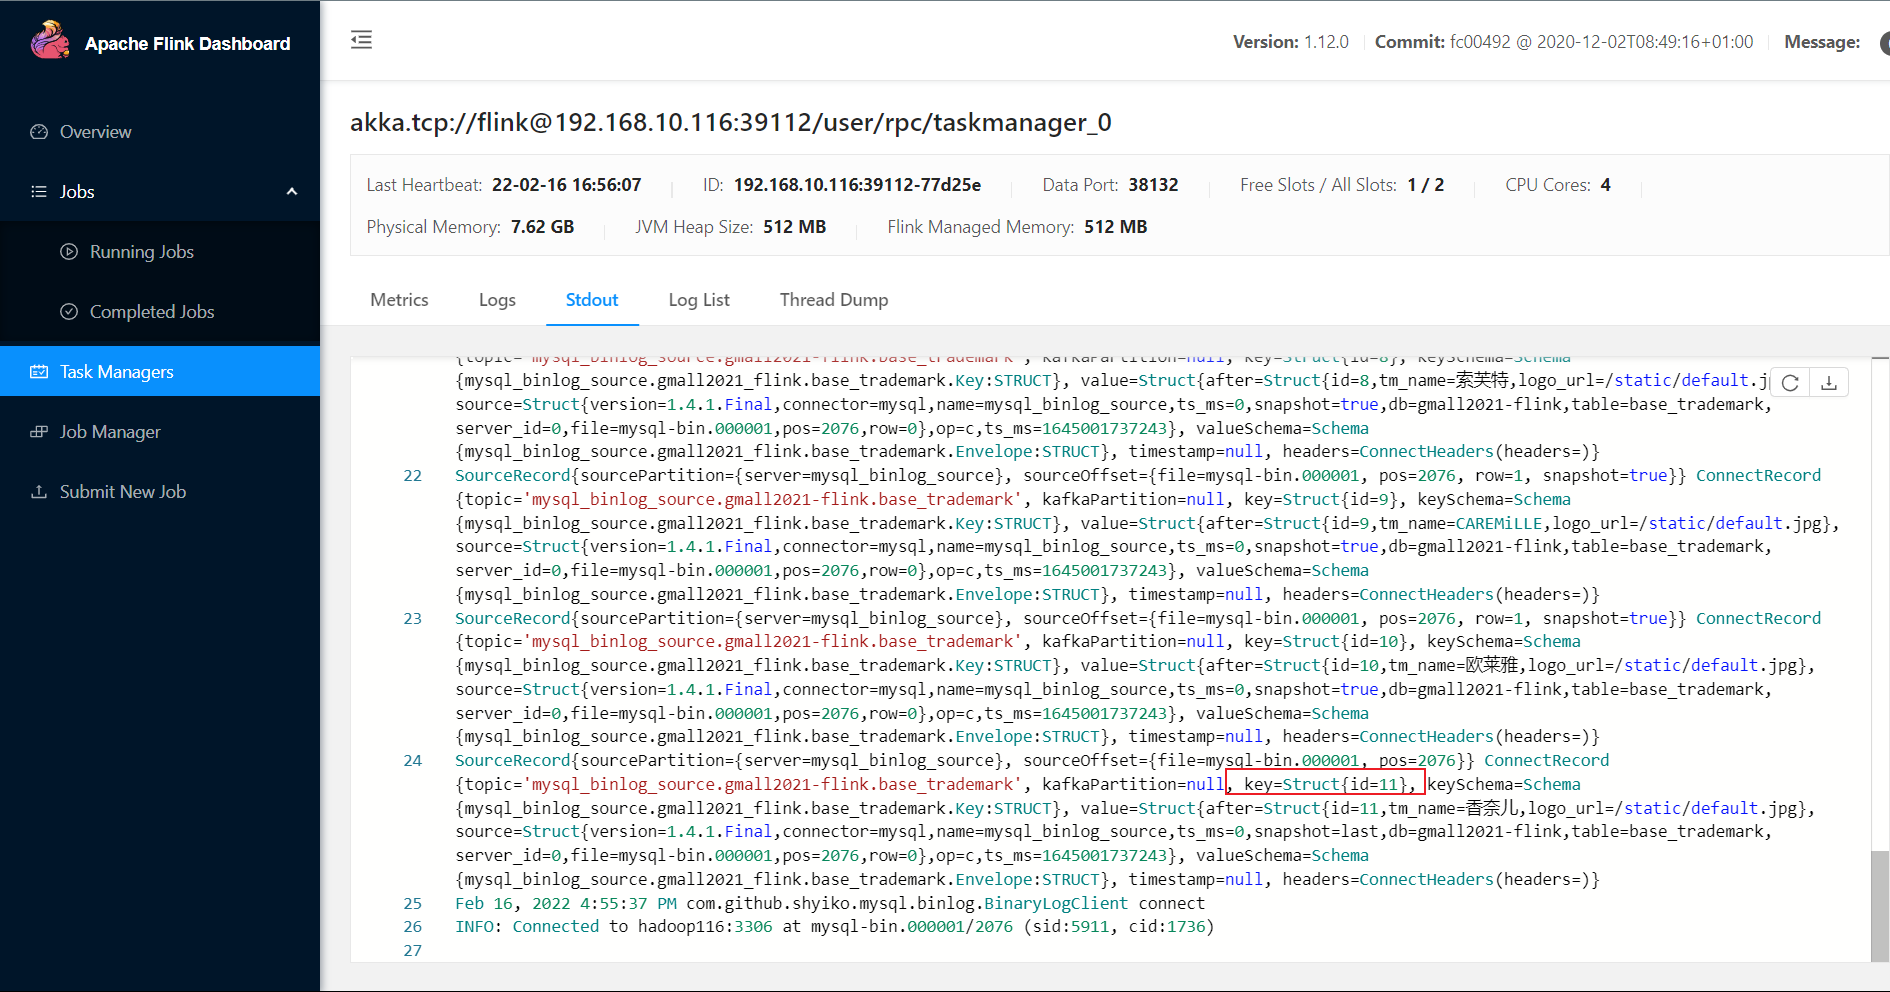
点击进入该jobmanager,查看输出:
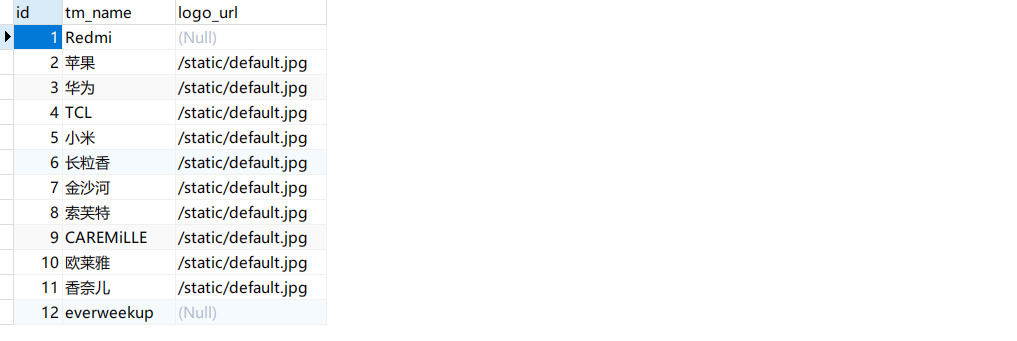
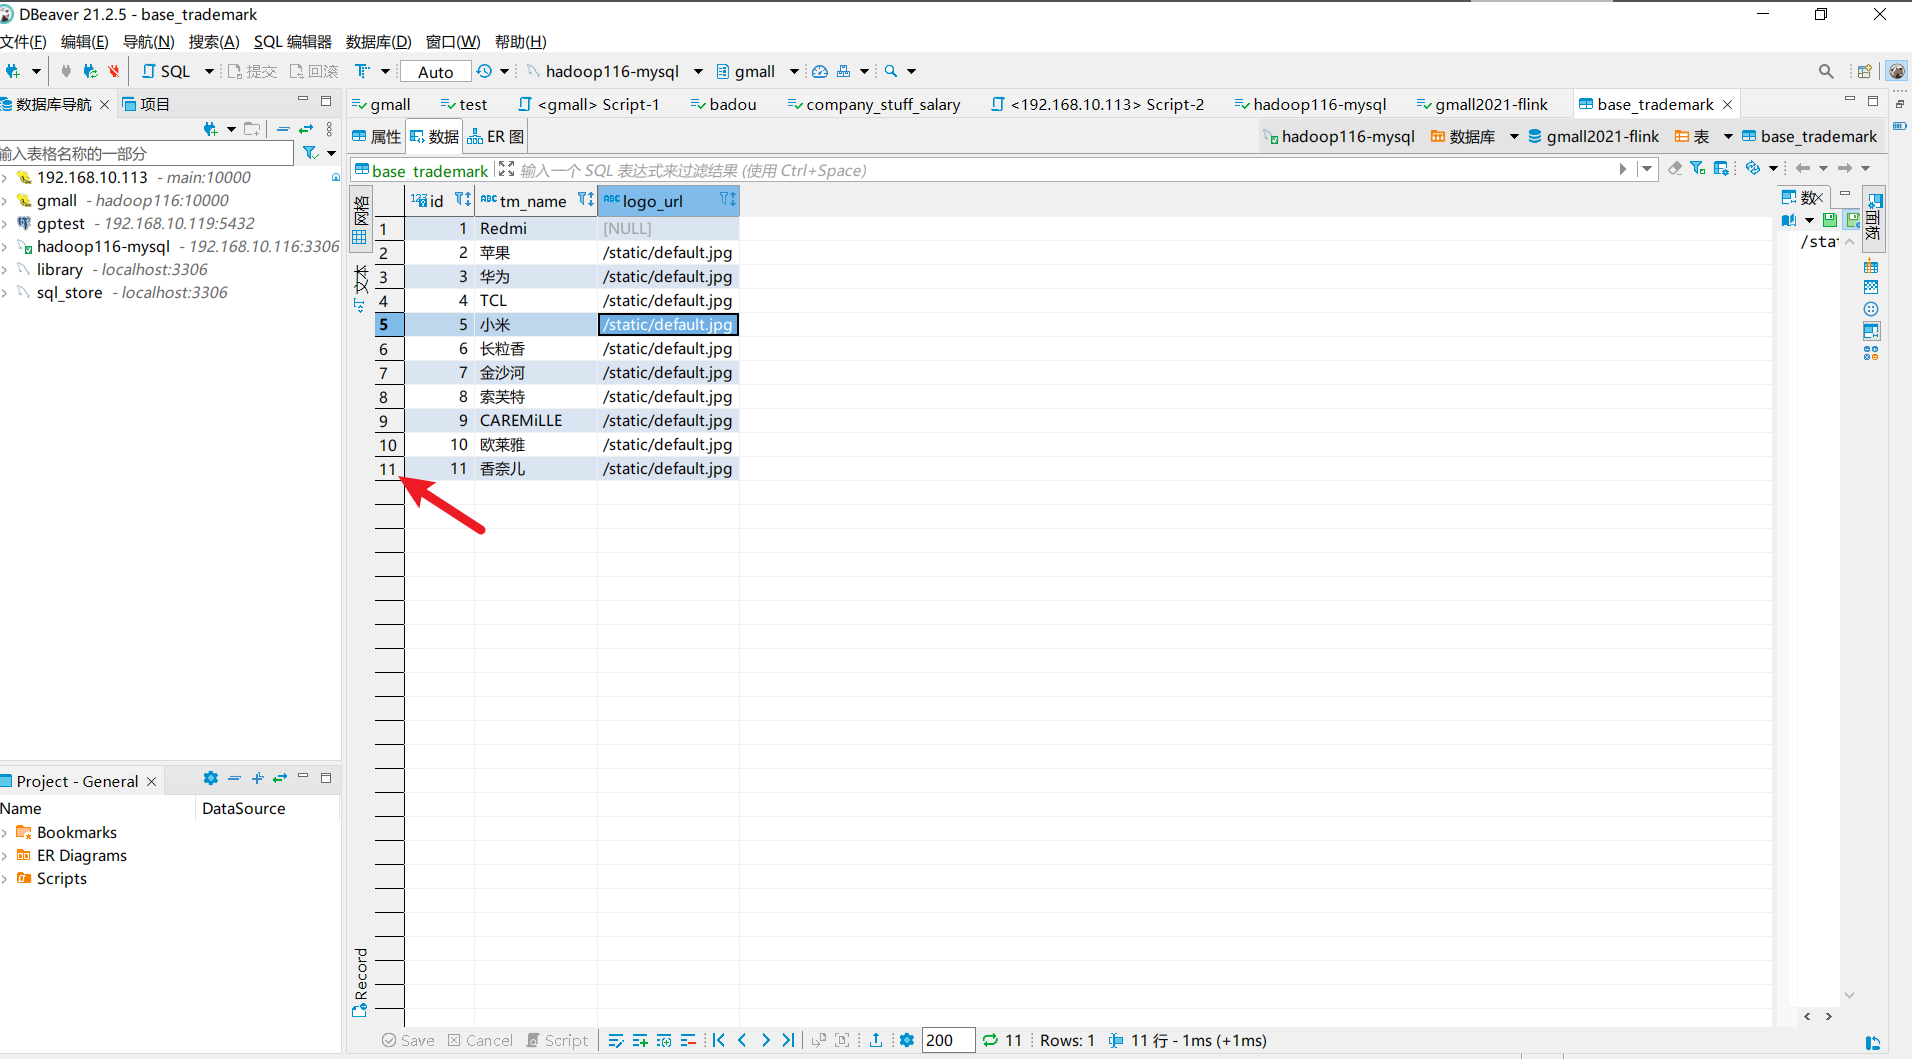
可以看到输出的记录最后的id=11,再查看数据库中对应表id:
记录对应上了。
测试 下面对测试数据库表数据进行增删改:
查看flink web端任务的日志变化:
手动设置savepoint 如果我们这个程序没有设置checkpoint,此时我们cancle任务,那么这个任务就整个没了,重启任务后依然会全量读取测试库表的binlog(由于flinkcdc程序设置的是initial)。
针对上面提到的情况,我们可以手动设置savepoint来解决:
1 (base) [dw@hadoop116 flink-1.12.0]$ ./bin/flink savepoint [任务id ] [savepoint存储的hdfs地址]
任务id可以在flink的web页面查找:
1 2 3 4 5 6 (base) [dw@hadoop116 flink-1.12.0]$ ./bin/flink savepoint 0de5333b7541a89d01e08e4843b05fdd hdfs://hadoop116:8020/gmall-flink-2021/sv Triggering savepoint for job 0de5333b7541a89d01e08e4843b05fdd. Waiting for response... Savepoint completed. Path: hdfs://hadoop116:8020/gmall-flink-2021/sv/savepoint-0de533-9393249d7058 You can resume your program from this savepoint with the run command . (base) [dw@hadoop116 flink-1.12.0]$
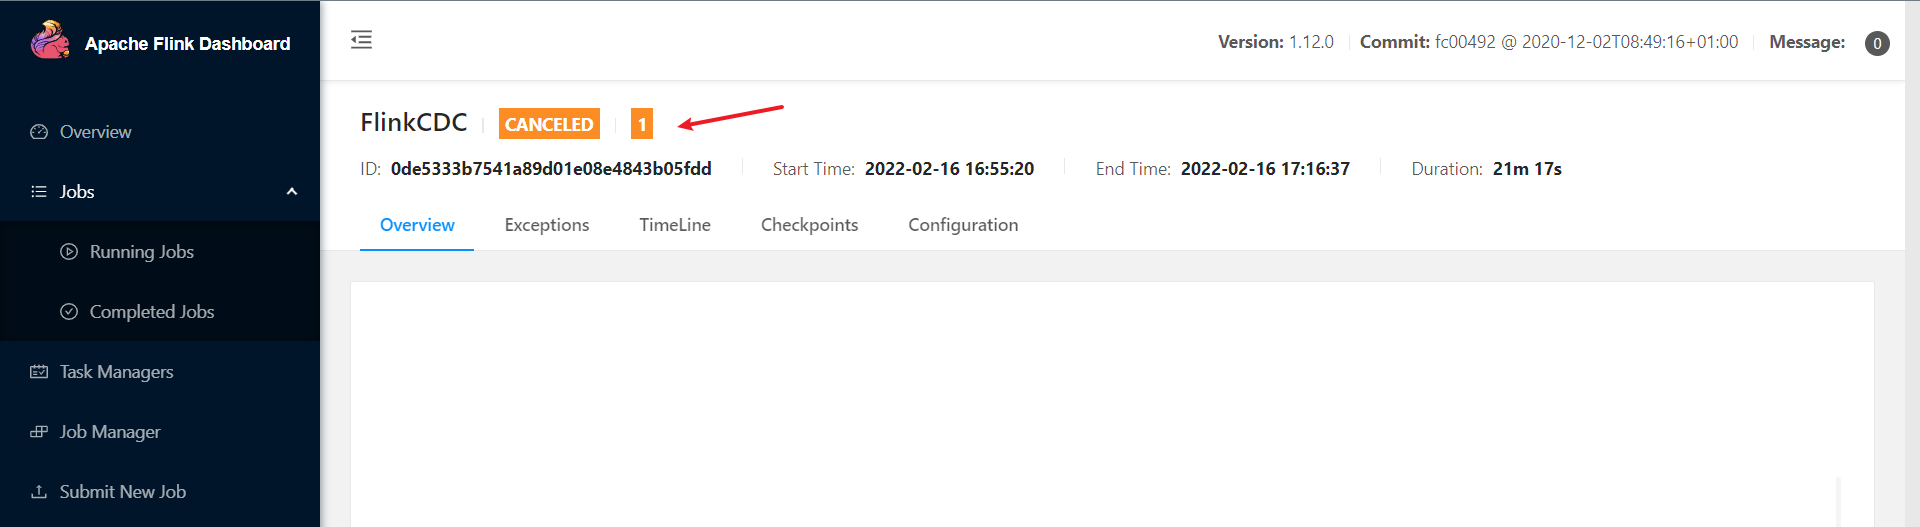
此时,我们cancel任务:
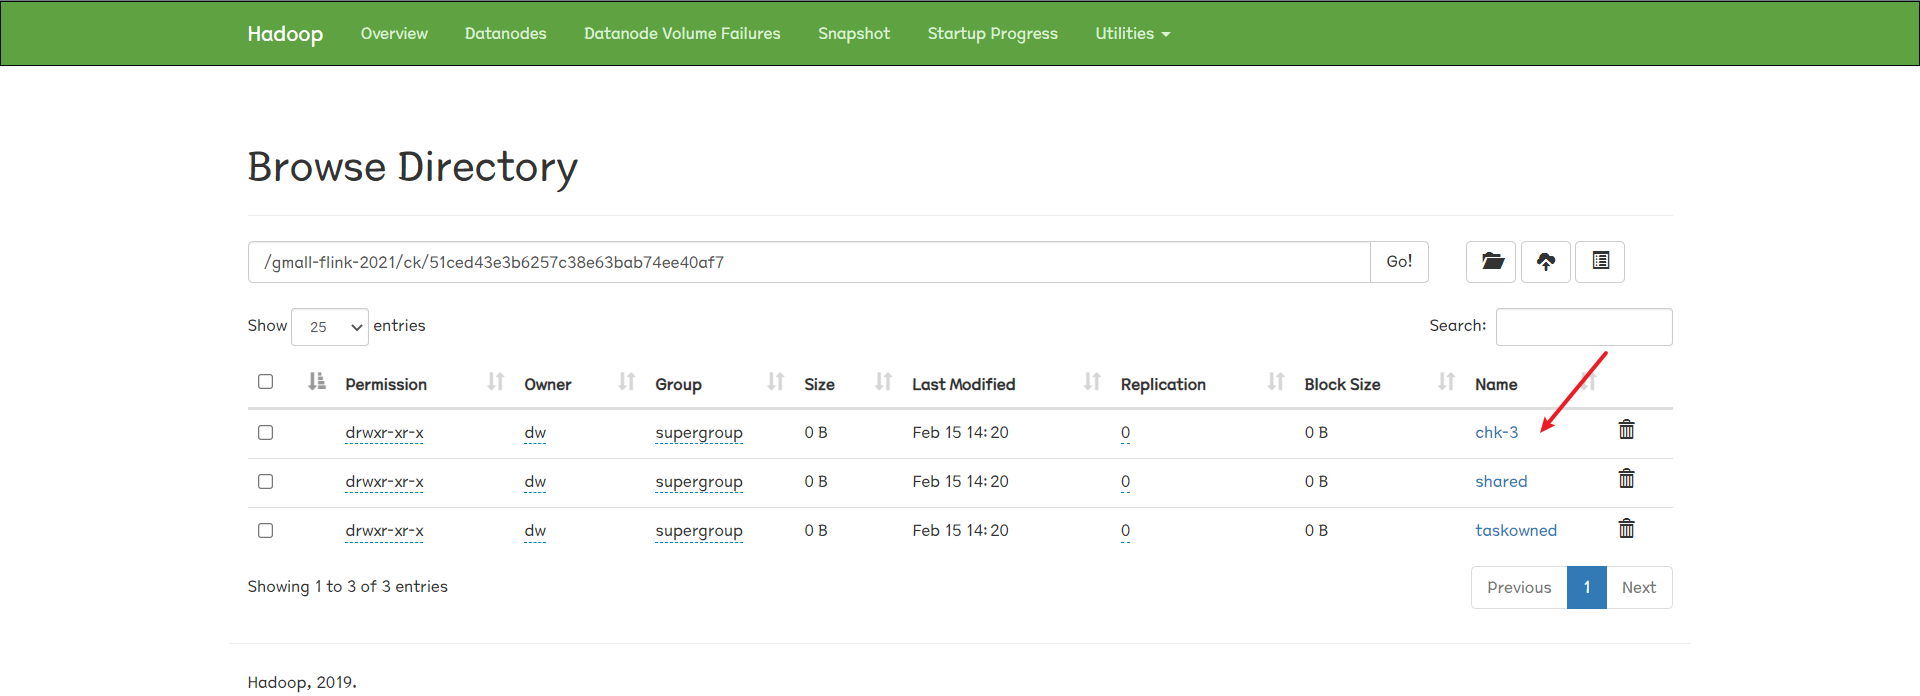
进入到hadoop文件系统web页面:
先查看下程序的checkpoint:
看看我们创建的savepoint:
测试savepoint 此时,任务挂掉后,我们再次修改测试数据库文件,检查重启任务后是否能恢复到savepoint的状态。
修改完测试数据库数据记录后,重新在终端启动任务并指定savepoint:
1 2 3 4 5 ./bin/flink run \ -m hadoop116:8081 \ -s hdfs://hadoop116:8020/gmall-flink-2021/sv/savepoint-0de533-9393249d7058 \ -c com.everweekup.FlinkCDC \ /opt/module/gmall-flink/flinkcdc/flink-cdc.jar
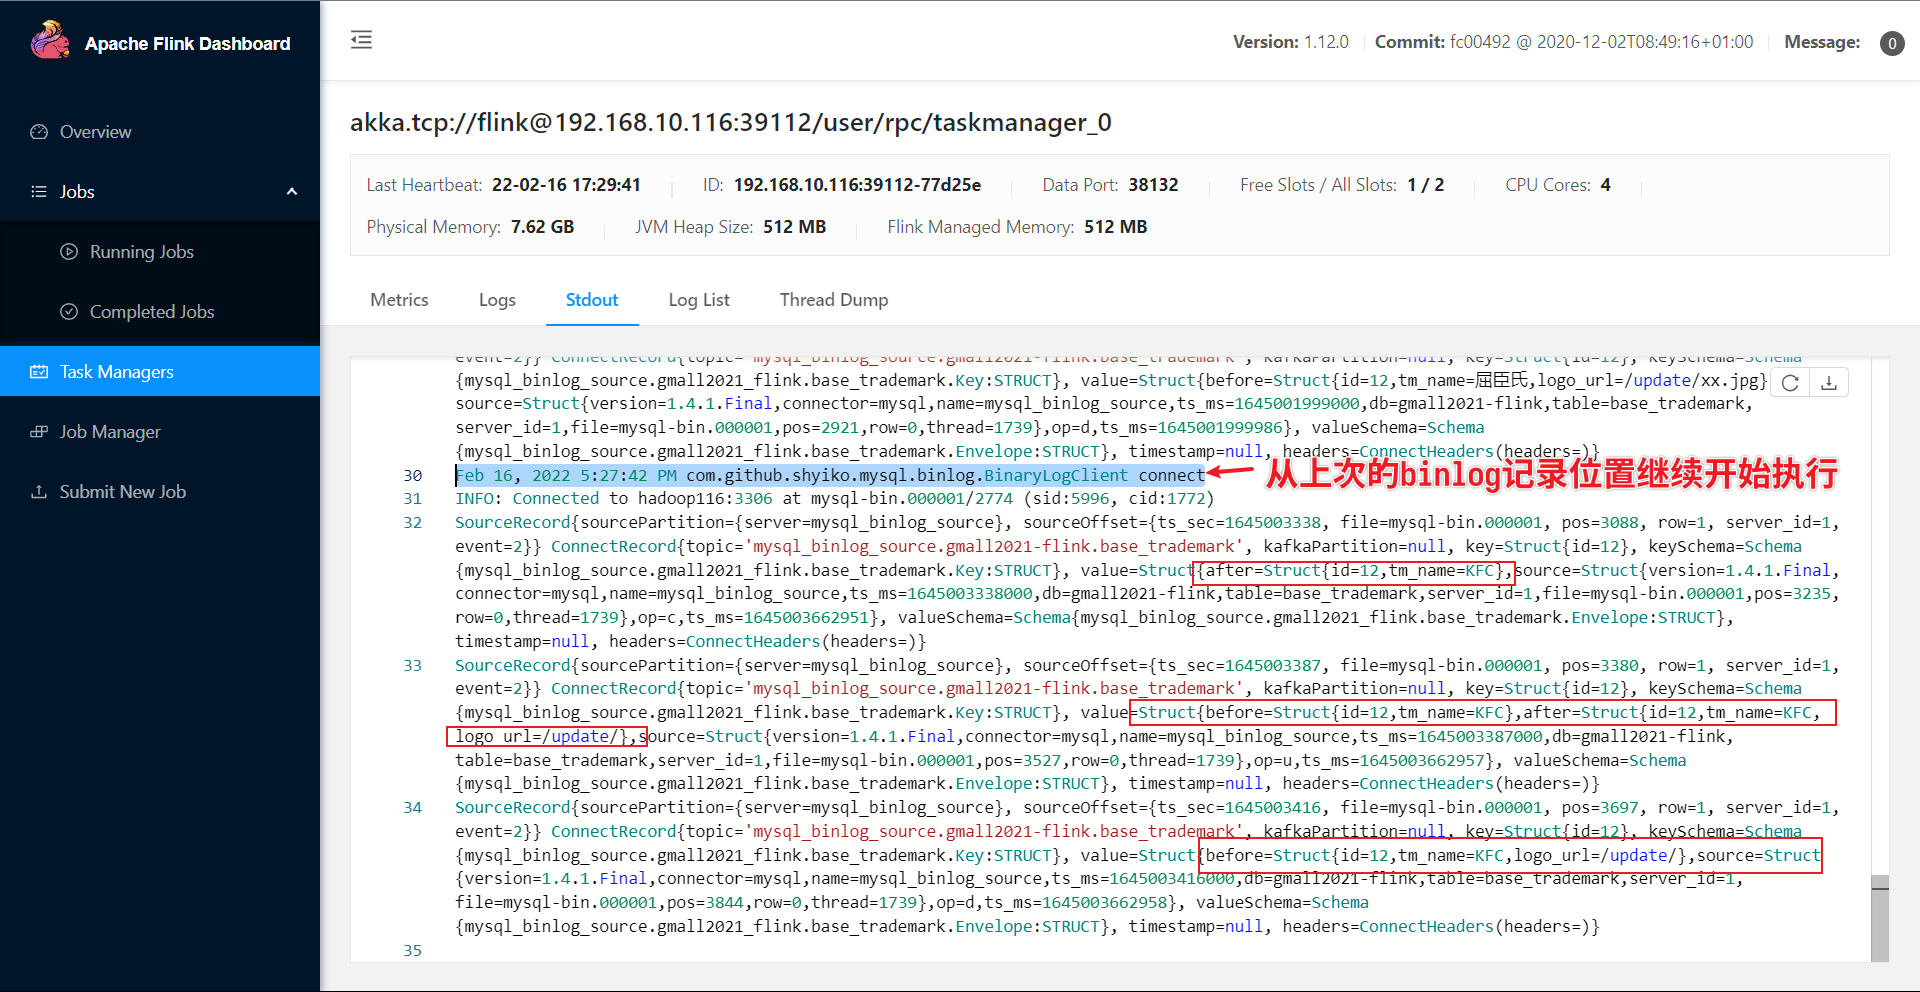
启动任务后,继续查看log日志:
可以看到,任务恢复到savepoint状态,并在savepoint状态开始继续往下执行。
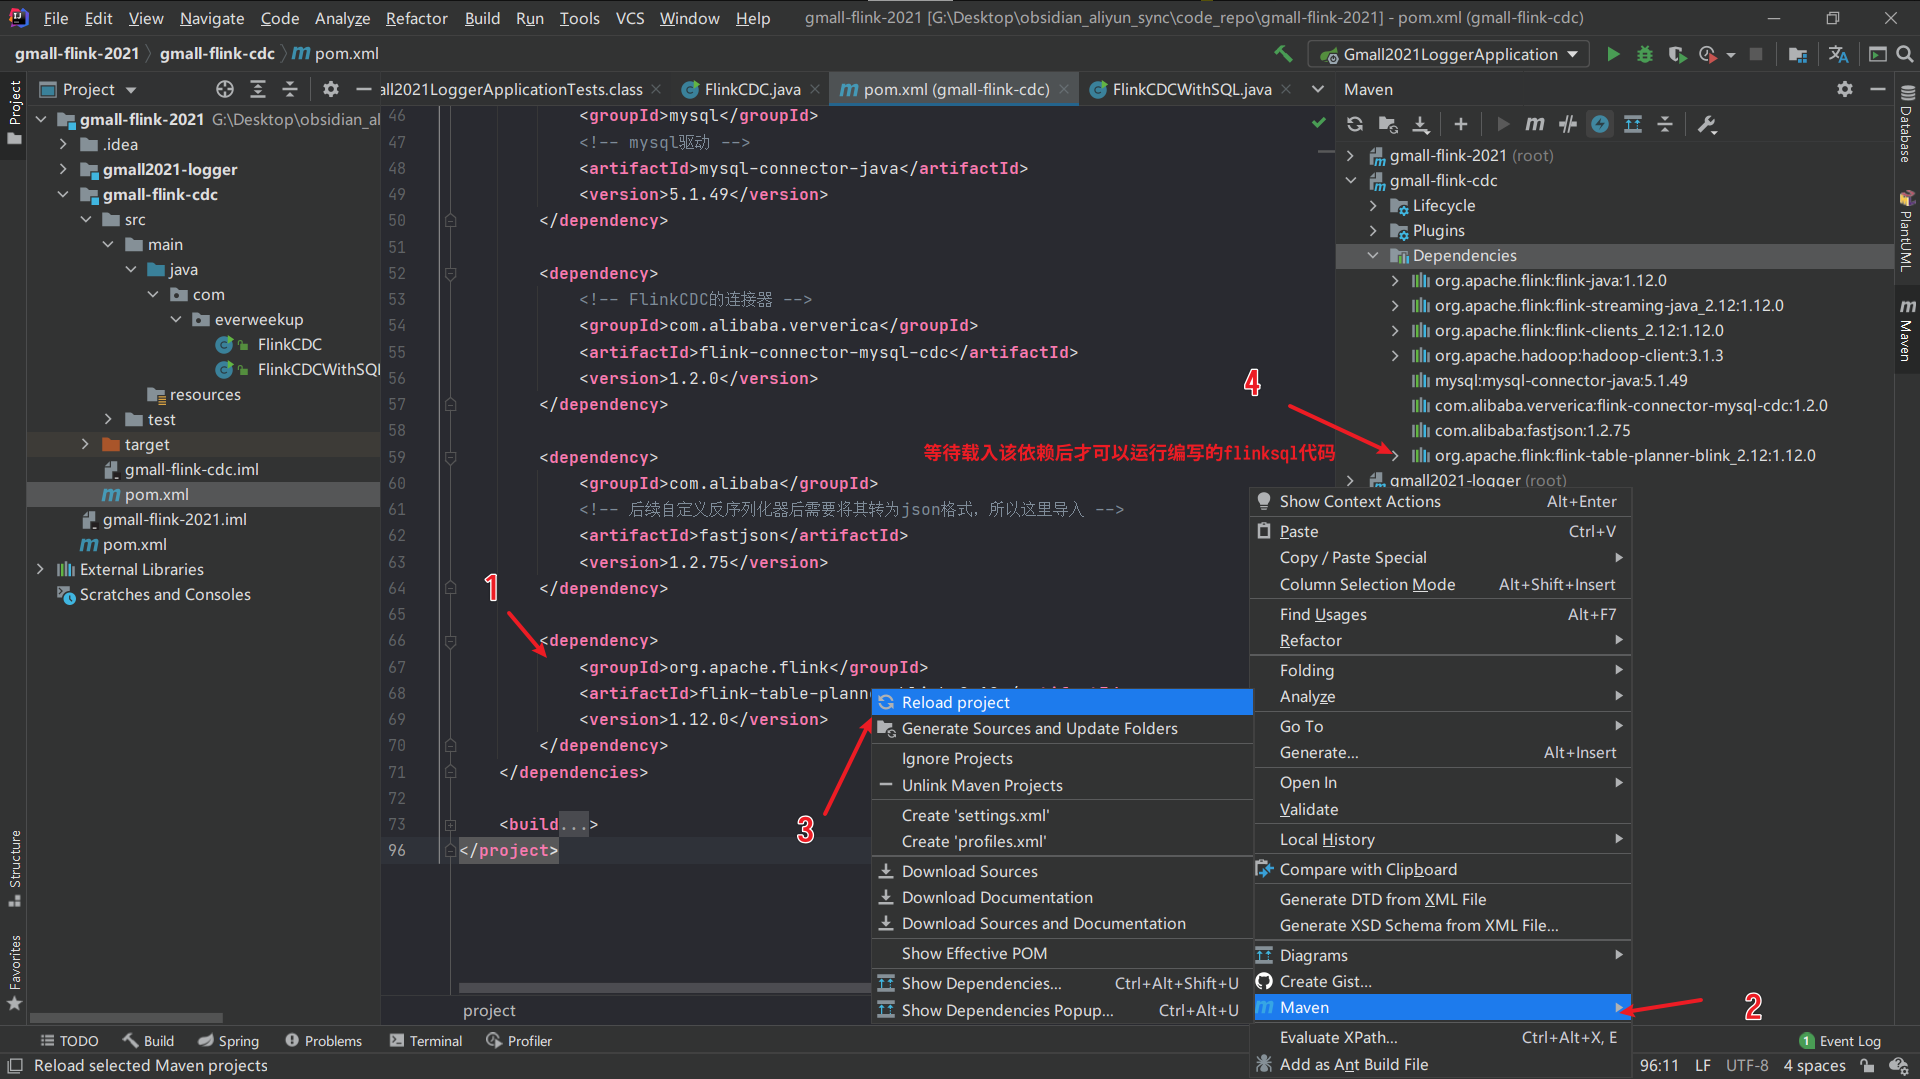
FlinkSql方式应用 导入依赖 打开代码的pom.xml文件,配置flinksql依赖。
1 2 3 4 5 <dependency> <groupId>org.apache.flink</groupId> <artifactId>flink-table-planner-blink_2.12</artifactId> <version>1.12.0</version> </dependency>
在idea里配置好后,配置maven重载依赖:
等上面的依赖都加载好后,我们重新创建一个class文件,来编写flinksql。
1 2 3 4 5 6 7 8 9 10 11 12 13 14 15 16 17 18 19 20 21 22 23 24 25 26 27 28 29 30 31 32 33 34 35 36 37 38 39 40 41 42 43 44 45 46 47 48 49 50 51 52 package com.everweekup;import org.apache.flink.api.java.tuple.Tuple2;import org.apache.flink.streaming.api.datastream.DataStream;import org.apache.flink.streaming.api.environment.StreamExecutionEnvironment;import org.apache.flink.table.api.Table;import org.apache.flink.table.api.bridge.java.StreamTableEnvironment;import org.apache.flink.types.Row;public class FlinkCDCWithSQL { public static void main (String[] args) throws Exception { StreamExecutionEnvironment env = StreamExecutionEnvironment.getExecutionEnvironment(); env.setParallelism(1 ); StreamTableEnvironment tableEnv = StreamTableEnvironment.create(env); tableEnv.executeSql("CREATE TABLE mysql_binlog ( " + "id STRING NOT NULL, " + "tm_name STRING, " + "logo_url STRING" + ") WITH ( " + " 'connector' = 'mysql-cdc', " + " 'hostname' = 'hadoop116', " + " 'port' = '3306', " + " 'username' = 'root', " + " 'password' = '888888', " + " 'database-name' = 'gmall2021-flink', " + " 'table-name' = 'base_trademark' " + ")" ); Table table = tableEnv.sqlQuery("select * from mysql_binlog" ); DataStream<Tuple2<Boolean, Row>> retractStream = tableEnv.toRetractStream(table, Row.class); retractStream.print(); env.execute("FlinkCDCWithSQL" ); } }
输出结果如下:
1 2 3 4 5 6 7 8 9 10 11 12 13 14 15 16 17 18 19 20 21 22 SLF4J: Failed to load class "org.slf4j.impl.StaticLoggerBinder". SLF4J: Defaulting to no-operation (NOP) logger implementation SLF4J: See http://www.slf4j.org/codes.html#StaticLoggerBinder for further details. log4j:WARN No appenders could be found for logger (org.apache.flink.shaded.netty4.io.netty.util.internal.logging.InternalLoggerFactory). log4j:WARN Please initialize the log4j system properly. log4j:WARN See http://logging.apache.org/log4j/1.2/faq.html#noconfig for more info. SLF4J: Failed to load class "org.slf4j.impl.StaticMDCBinder". SLF4J: Defaulting to no-operation MDCAdapter implementation. SLF4J: See http://www.slf4j.org/codes.html#no_static_mdc_binder for further details. (true,1,Redmi,null) (true,2,苹果,/static/default.jpg) (true,3,华为,/static/default.jpg) (true,4,TCL,/static/default.jpg) (true,5,小米,/static/default.jpg) (true,6,长粒香,/static/default.jpg) (true,7,金沙河,/static/default.jpg) (true,8,索芙特,/static/default.jpg) (true,9,CAREMiLLE,/static/default.jpg) (true,10,欧莱雅,/static/default.jpg) (true,11,香奈儿,/static/default.jpg) 二月 16, 2022 11:15:19 下午 com.github.shyiko.mysql.binlog.BinaryLogClient connect 信息: Connected to hadoop116:3306 at mysql-bin.000001/3934 (sid:6257, cid:1990)
自定义反序列化器 在我们之前使用的DataStream API中,自己携带的反序列化类的输出结果如下:
1 2 3 SourceRecord{sourcePartition={server=mysql_binlog_source}, sourceOffset={file=mysql-bin.000001, pos=3934}} ConnectRecord{topic='mysql_binlog_source.gmall2021-flink.base_trademark', kafkaPartition=null, key=Struct{id=11}, keySchema=Schema{mysql_binlog_source.gmall2021_flink.base_trademark.Key:STRUCT}, value=Struct{after=Struct{id=11,tm_name=香奈儿,logo_url=/static/default.jpg},source=Struct{version=1.4.1.Final,connector=mysql,name=mysql_binlog_source,ts_ms=0,snapshot=last,db=gmall2021-flink,table=base_trademark,server_id=0,file=mysql-bin.000001,pos=3934,row=0},op=c,ts_ms=1645512451084}, valueSchema=Schema{mysql_binlog_source.gmall2021_flink.base_trademark.Envelope:STRUCT}, timestamp=null, headers=ConnectHeaders(headers=)} 二月 22, 2022 2:47:31 下午 com.github.shyiko.mysql.binlog.BinaryLogClient connect 信息: Connected to hadoop116:3306 at mysql-bin.000001/3934 (sid:6133, cid:2050)
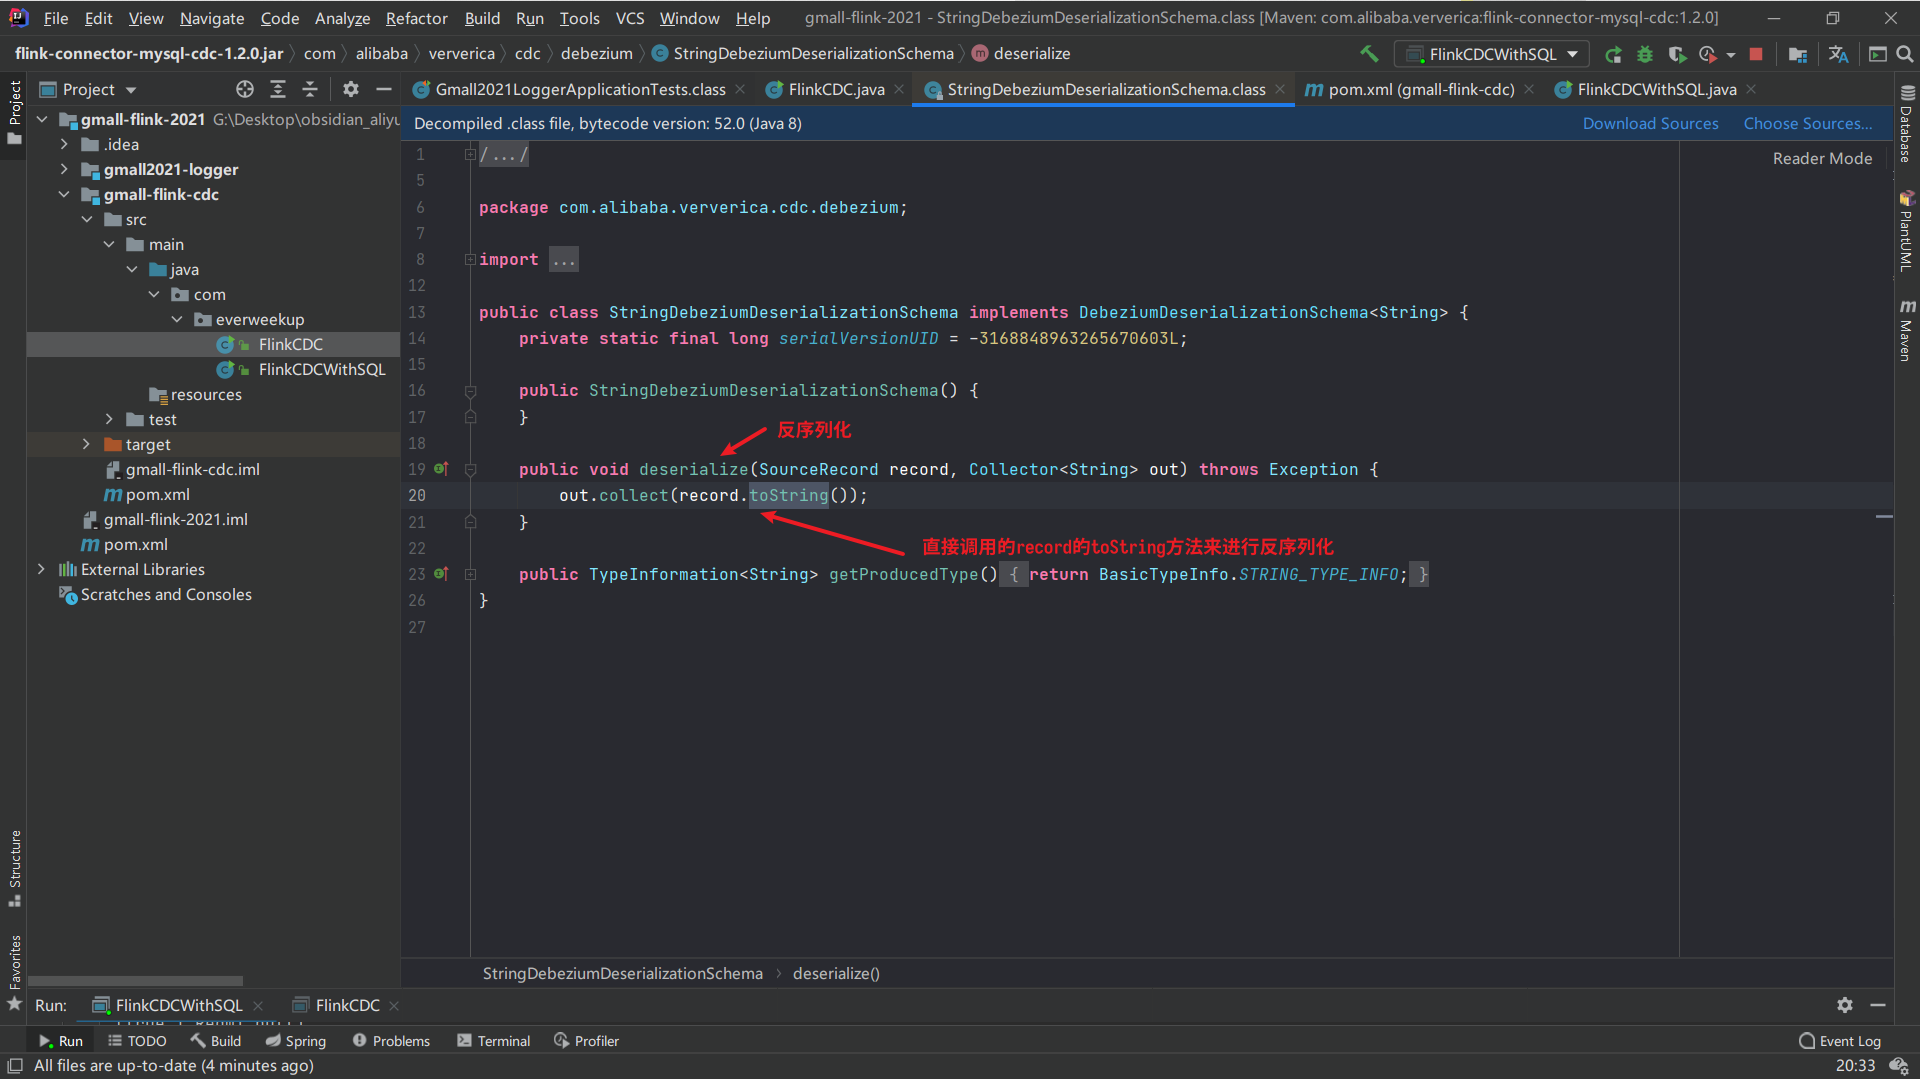
这里我们查看下DataStream的反序列化类是如何写的:
因此,我们可以看到输出的结果明显是一个对象({key={key:value},…}),这种方式打印并无问题,但是我们这个信息不仅仅是用来打印,还需要传到ODS层进行消费,生成DWD。因此,这样的反序列化方式,我们下游是无法处理的,因此需要我们去自定义一个反序列化器。
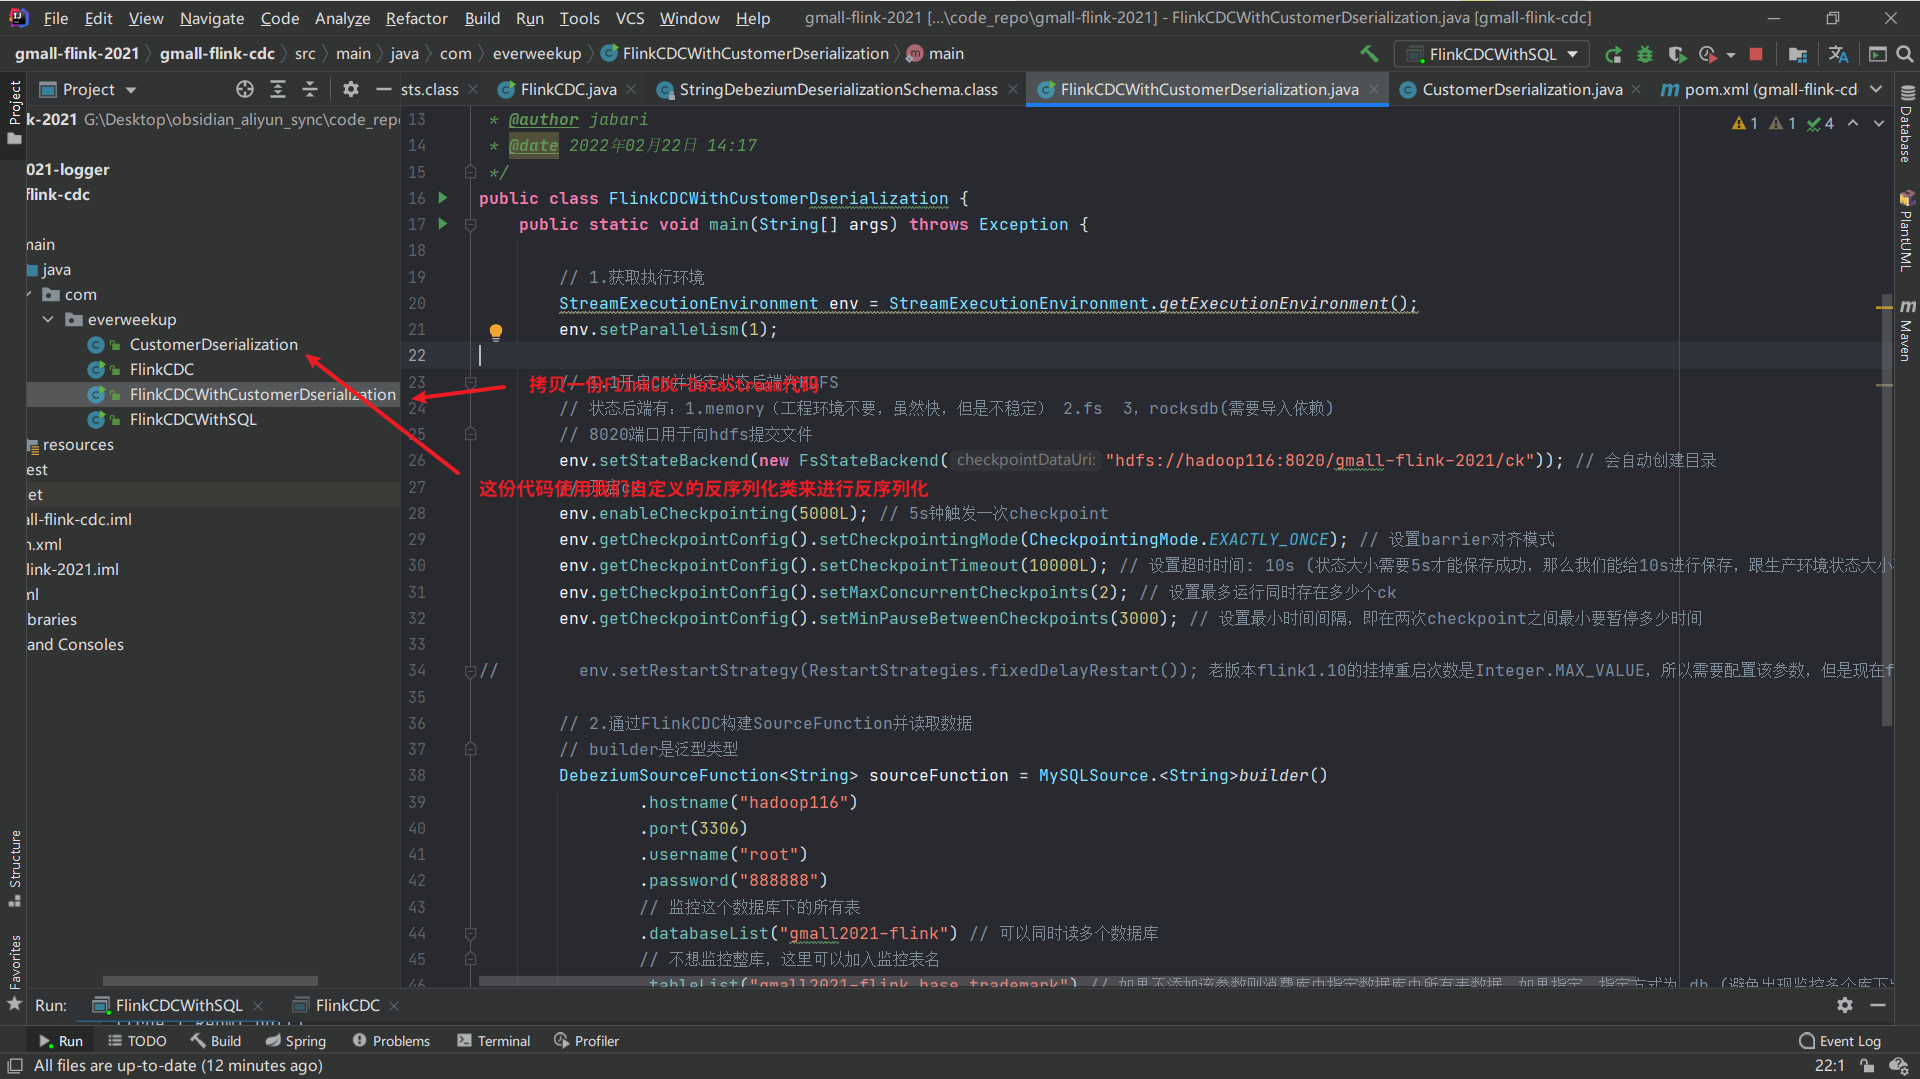
FlinkCDCWithCustomerDserialization代码:
1 2 3 4 5 6 7 8 9 10 11 12 13 14 15 16 17 18 19 20 21 22 23 24 25 26 27 28 29 30 31 32 33 34 35 36 37 38 39 40 41 42 43 44 45 46 package com.everweekup;import com.alibaba.ververica.cdc.connectors.mysql.MySQLSource;import com.alibaba.ververica.cdc.connectors.mysql.table.StartupOptions;import com.alibaba.ververica.cdc.debezium.DebeziumSourceFunction;import com.alibaba.ververica.cdc.debezium.StringDebeziumDeserializationSchema;import org.apache.flink.runtime.state.filesystem.FsStateBackend;import org.apache.flink.streaming.api.CheckpointingMode;import org.apache.flink.streaming.api.datastream.DataStreamSource;import org.apache.flink.streaming.api.environment.StreamExecutionEnvironment;public class FlinkCDCWithCustomerDserialization { public static void main (String[] args) throws Exception { StreamExecutionEnvironment env = StreamExecutionEnvironment.getExecutionEnvironment(); env.setParallelism(1 ); DebeziumSourceFunction<String> sourceFunction = MySQLSource.<String>builder() .hostname("hadoop116" ) .port(3306 ) .username("root" ) .password("888888" ) .databaseList("gmall2021-flink" ) .tableList("gmall2021-flink.base_trademark" ) .deserializer(new StringDebeziumDeserializationSchema ()) .startupOptions(StartupOptions.initial()) .build(); DataStreamSource<String> streamSource = env.addSource(sourceFunction); streamSource.print(); env.execute("FlinkCDC" ); } }
在CustomerDserialization类中,我们需要实现一个接口或继承某个抽象类,这里我们参考DataStream API原始的反序列化类去实现对应的接口。
1 2 3 4 5 6 7 8 9 10 11 12 13 14 15 16 17 18 19 20 21 22 23 24 25 26 package com.alibaba.ververica.cdc.debezium;import org.apache.flink.api.common.typeinfo.BasicTypeInfo;import org.apache.flink.api.common.typeinfo.TypeInformation;import org.apache.flink.util.Collector;import org.apache.kafka.connect.source.SourceRecord;public class StringDebeziumDeserializationSchema implements DebeziumDeserializationSchema <String> { private static final long serialVersionUID = -3168848963265670603L ; public StringDebeziumDeserializationSchema () { } public void deserialize (SourceRecord record, Collector<String> out) throws Exception { out.collect(record.toString()); } public TypeInformation<String> getProducedType () { return BasicTypeInfo.STRING_TYPE_INFO; } }
我们手动自定义的反序列化类:
1 2 3 4 5 6 7 8 9 10 11 12 13 14 15 16 17 18 19 20 21 22 23 24 25 26 27 28 29 30 31 32 33 34 35 36 package com.everweekup;import com.alibaba.ververica.cdc.debezium.DebeziumDeserializationSchema;import org.apache.flink.api.common.typeinfo.TypeInformation;import org.apache.flink.util.Collector;import org.apache.kafka.connect.source.SourceRecord;public class CustomerDserialization implements DebeziumDeserializationSchema <String> { @Override public void deserialize (SourceRecord sourceRecord, Collector<String> collector) throws Exception { } @Override public TypeInformation<String> getProducedType () { return BasicTypeInfo.STRING_TYPE_INFO; } }
在这里,我们需要实现接口DebeziumDeserializationSchema<String>和它的两个方法,其中deserialize方法最为核心。
在实现该方法前,需要确定用什么来封装对象,这里我们采用json来封装我们获取的数据对象,方便我们后续的处理。
在确定json对象后,我们需要确定json字段,这里根据后面处理所需的字段来定义json字段。
在这里我们根据sourceRecord的数据来写deserialize类:
1 2 3 SourceRecord{ sourcePartition={ server=mysql_binlog_source} , sourceOffset={ file=mysql-bin.000001 , pos=3934 } } ConnectRecord{ topic='mysql_binlog_source.gmall2021-flink.base_trademark', kafkaPartition=null , key=Struct{ id=11 } , keySchema=Schema{ mysql_binlog_source.gmall2021_flink.base_trademark.Key: STRUCT} , value=Struct{ after=Struct{ id=11 , tm_name=香奈儿, logo_url=/static/default.jpg} , source=Struct{ version=1.4 .1 .Final, connector=mysql, name=mysql_binlog_source, ts_ms=0 , snapshot=last, db=gmall2021-flink, table=base_trademark, server_id=0 , file=mysql-bin.000001 , pos=3934 , row=0 } , op=c, ts_ms=1645512451084 } , valueSchema=Schema{ mysql_binlog_source.gmall2021_flink.base_trademark.Envelope: STRUCT} , timestamp=null , headers=ConnectHeaders(headers=) }
自定义序列化类CustomerDserialization方法:
1 2 3 4 5 6 7 8 9 10 11 12 13 14 15 16 17 18 19 20 21 22 23 24 25 26 27 28 29 30 31 32 33 34 35 36 37 38 39 40 41 42 43 44 45 46 47 48 49 50 51 52 53 54 55 56 57 58 59 60 61 62 63 64 65 66 67 68 69 70 71 72 73 74 75 76 77 78 79 80 81 82 83 package com.everweekup;import com.alibaba.fastjson.JSONObject;import com.alibaba.ververica.cdc.debezium.DebeziumDeserializationSchema;import io.debezium.data.Envelope;import org.apache.flink.api.common.typeinfo.BasicTypeInfo;import org.apache.flink.api.common.typeinfo.TypeInformation;import org.apache.flink.util.Collector;import org.apache.kafka.connect.data.Field;import org.apache.kafka.connect.data.Schema;import org.apache.kafka.connect.data.Struct;import org.apache.kafka.connect.source.SourceRecord;import java.util.List;public class CustomerDserialization implements DebeziumDeserializationSchema <String> { @Override public void deserialize (SourceRecord sourceRecord, Collector<String> collector) throws Exception { JSONObject result = new JSONObject (); String topic = sourceRecord.topic(); String[] fields = topic.split("\\." ); String database = fields[1 ]; String tableName = fields[2 ]; Struct value = (Struct)sourceRecord.value(); Struct before = value.getStruct("before" ); JSONObject beforeJson = new JSONObject (); if (before != null ){ Schema beforeSchema = before.schema(); List<Field> beforeFields = beforeSchema.fields(); for (Field field : beforeFields) { Object beforeValue = before.get(field); beforeJson.put(field.name(), beforeValue); } } Struct after = value.getStruct("after" ); JSONObject afterJson = new JSONObject (); if (after != null ){ Schema afterSchema = after.schema(); List<Field> afterFields = afterSchema.fields(); for (Field field : afterFields) { Object afterValue = after.get(field); afterJson.put(field.name(), afterValue); } } Envelope.Operation operation = Envelope.operationFor(sourceRecord); result.put("database" , database); result.put("tableName" , tableName); result.put("before" , beforeJson); result.put("after" , afterJson); result.put("opt_type" , operation); collector.collect(result.toJSONString()); } @Override public TypeInformation<String> getProducedType () { return BasicTypeInfo.STRING_TYPE_INFO; } }
最后,我们运行FlinkCDCWithCustomerDserialization类方法,调用我们自定义的反序列化方法:
1 2 3 4 5 6 7 8 9 10 11 12 13 14 15 16 17 18 19 20 21 22 23 24 25 26 27 28 29 30 31 32 33 34 35 36 37 38 39 40 41 42 43 44 45 46 package com.everweekup;import com.alibaba.ververica.cdc.connectors.mysql.MySQLSource;import com.alibaba.ververica.cdc.connectors.mysql.table.StartupOptions;import com.alibaba.ververica.cdc.debezium.DebeziumSourceFunction;import com.alibaba.ververica.cdc.debezium.StringDebeziumDeserializationSchema;import org.apache.flink.runtime.state.filesystem.FsStateBackend;import org.apache.flink.streaming.api.CheckpointingMode;import org.apache.flink.streaming.api.datastream.DataStreamSource;import org.apache.flink.streaming.api.environment.StreamExecutionEnvironment;public class FlinkCDCWithCustomerDserialization { public static void main (String[] args) throws Exception { StreamExecutionEnvironment env = StreamExecutionEnvironment.getExecutionEnvironment(); env.setParallelism(1 ); DebeziumSourceFunction<String> sourceFunction = MySQLSource.<String>builder() .hostname("hadoop116" ) .port(3306 ) .username("root" ) .password("888888" ) .databaseList("gmall2021-flink" ) .tableList("gmall2021-flink.base_trademark" ) .deserializer(new CustomerDserialization ()) .startupOptions(StartupOptions.initial()) .build(); DataStreamSource<String> streamSource = env.addSource(sourceFunction); streamSource.print(); env.execute("FlinkCDCWithCustomerDserialization" ); } }
运行结果:
1 2 3 4 5 6 7 8 9 10 11 12 13 { "database" : "gmall2021-flink" , "before" : { } , "opt_type" : "CREATE" , "after" : { "tm_name" : "Redmi" , "id" : 1 } , "tableName" : "base_trademark" } { "database" : "gmall2021-flink" , "before" : { } , "opt_type" : "CREATE" , "after" : { "tm_name" : "苹果" , "logo_url" : "/static/default.jpg" , "id" : 2 } , "tableName" : "base_trademark" } { "database" : "gmall2021-flink" , "before" : { } , "opt_type" : "CREATE" , "after" : { "tm_name" : "华为" , "logo_url" : "/static/default.jpg" , "id" : 3 } , "tableName" : "base_trademark" } { "database" : "gmall2021-flink" , "before" : { } , "opt_type" : "CREATE" , "after" : { "tm_name" : "TCL" , "logo_url" : "/static/default.jpg" , "id" : 4 } , "tableName" : "base_trademark" } { "database" : "gmall2021-flink" , "before" : { } , "opt_type" : "CREATE" , "after" : { "tm_name" : "小米" , "logo_url" : "/static/default.jpg" , "id" : 5 } , "tableName" : "base_trademark" } { "database" : "gmall2021-flink" , "before" : { } , "opt_type" : "CREATE" , "after" : { "tm_name" : "长粒香" , "logo_url" : "/static/default.jpg" , "id" : 6 } , "tableName" : "base_trademark" } { "database" : "gmall2021-flink" , "before" : { } , "opt_type" : "CREATE" , "after" : { "tm_name" : "金沙河" , "logo_url" : "/static/default.jpg" , "id" : 7 } , "tableName" : "base_trademark" } { "database" : "gmall2021-flink" , "before" : { } , "opt_type" : "CREATE" , "after" : { "tm_name" : "索芙特" , "logo_url" : "/static/default.jpg" , "id" : 8 } , "tableName" : "base_trademark" } { "database" : "gmall2021-flink" , "before" : { } , "opt_type" : "CREATE" , "after" : { "tm_name" : "CAREMiLLE" , "logo_url" : "/static/default.jpg" , "id" : 9 } , "tableName" : "base_trademark" } { "database" : "gmall2021-flink" , "before" : { } , "opt_type" : "CREATE" , "after" : { "tm_name" : "欧莱雅" , "logo_url" : "/static/default.jpg" , "id" : 10 } , "tableName" : "base_trademark" } { "database" : "gmall2021-flink" , "before" : { } , "opt_type" : "CREATE" , "after" : { "tm_name" : "香奈儿" , "logo_url" : "/static/default.jpg" , "id" : 11 } , "tableName" : "base_trademark" } 二月 22 , 2022 4 : 19 : 33 下午 com.github.shyiko.mysql.binlog.BinaryLogClient connect 信息: Connected to hadoop116: 3306 at mysql-bin.000001 /3934 (sid: 5692 , cid: 2151 )
数据库表手动增删改数据,结果输出:
1 2 3 4 5 6 7 8 9 10 11 12 13 14 15 16 17 18 19 20 21 22 23 24 25 26 27 28 29 30 31 32 33 34 35 { "database" : "gmall2021-flink" , "before" : { } , "opt_type" : "CREATE" , "after" : { "tm_name" : "everweekup" , "id" : 12 } , "tableName" : "base_trademark" } { "database" : "gmall2021-flink" , "before" : { "tm_name" : "everweekup" , "id" : 12 } , "opt_type" : "UPDATE" , "after" : { "tm_name" : "everweekup" , "logo_url" : "aaa" , "id" : 12 } , "tableName" : "base_trademark" } { "database" : "gmall2021-flink" , "before" : { "tm_name" : "everweekup" , "logo_url" : "aaa" , "id" : 12 } , "opt_type" : "DELETE" , "after" : { } , "tableName" : "base_trademark" }
这里我们再次对CustomerDserialization类进行修改:
1 2 3 4 5 6 7 8 9 10 11 12 13 14 15 16 17 18 19 20 21 22 23 24 25 26 27 28 29 30 31 32 33 34 35 36 37 38 39 40 41 42 43 44 45 46 47 48 49 50 51 52 53 54 55 56 57 58 59 60 61 62 63 64 65 66 67 68 69 70 71 72 73 74 75 76 77 78 79 80 81 82 83 84 85 86 87 package com.everweekup;import com.alibaba.fastjson.JSONObject;import com.alibaba.ververica.cdc.debezium.DebeziumDeserializationSchema;import io.debezium.data.Envelope;import org.apache.flink.api.common.typeinfo.BasicTypeInfo;import org.apache.flink.api.common.typeinfo.TypeInformation;import org.apache.flink.util.Collector;import org.apache.kafka.connect.data.Field;import org.apache.kafka.connect.data.Schema;import org.apache.kafka.connect.data.Struct;import org.apache.kafka.connect.source.SourceRecord;import java.util.List;public class CustomerDserialization implements DebeziumDeserializationSchema <String> { @Override public void deserialize (SourceRecord sourceRecord, Collector<String> collector) throws Exception { JSONObject result = new JSONObject (); String topic = sourceRecord.topic(); String[] fields = topic.split("\\." ); String database = fields[1 ]; String tableName = fields[2 ]; Struct value = (Struct)sourceRecord.value(); Struct before = value.getStruct("before" ); JSONObject beforeJson = new JSONObject (); if (before != null ){ Schema beforeSchema = before.schema(); List<Field> beforeFields = beforeSchema.fields(); for (Field field : beforeFields) { Object beforeValue = before.get(field); beforeJson.put(field.name(), beforeValue); } } Struct after = value.getStruct("after" ); JSONObject afterJson = new JSONObject (); if (after != null ){ Schema afterSchema = after.schema(); List<Field> afterFields = afterSchema.fields(); for (Field field : afterFields) { Object afterValue = after.get(field); afterJson.put(field.name(), afterValue); } } Envelope.Operation operation = Envelope.operationFor(sourceRecord); String type = operation.toString().toLowerCase(); if ("create" .equals(type)){ type = "insert" ; } result.put("database" , database); result.put("tableName" , tableName); result.put("before" , beforeJson); result.put("after" , afterJson); result.put("opt_type" , type); collector.collect(result.toJSONString()); } @Override public TypeInformation<String> getProducedType () { return BasicTypeInfo.STRING_TYPE_INFO; } }
这里重新运行自定义反序列化器flinkCDC代码:
1 2 3 4 5 6 7 8 9 10 11 { "database" : "gmall2021-flink" , "before" : { } , "opt_type" : "insert" , "after" : { "tm_name" : "Redmi" , "id" : 1 } , "tableName" : "base_trademark" } { "database" : "gmall2021-flink" , "before" : { } , "opt_type" : "insert" , "after" : { "tm_name" : "苹果" , "logo_url" : "/static/default.jpg" , "id" : 2 } , "tableName" : "base_trademark" } { "database" : "gmall2021-flink" , "before" : { } , "opt_type" : "insert" , "after" : { "tm_name" : "华为" , "logo_url" : "/static/default.jpg" , "id" : 3 } , "tableName" : "base_trademark" } { "database" : "gmall2021-flink" , "before" : { } , "opt_type" : "insert" , "after" : { "tm_name" : "TCL" , "logo_url" : "/static/default.jpg" , "id" : 4 } , "tableName" : "base_trademark" } { "database" : "gmall2021-flink" , "before" : { } , "opt_type" : "insert" , "after" : { "tm_name" : "小米" , "logo_url" : "/static/default.jpg" , "id" : 5 } , "tableName" : "base_trademark" } { "database" : "gmall2021-flink" , "before" : { } , "opt_type" : "insert" , "after" : { "tm_name" : "长粒香" , "logo_url" : "/static/default.jpg" , "id" : 6 } , "tableName" : "base_trademark" } { "database" : "gmall2021-flink" , "before" : { } , "opt_type" : "insert" , "after" : { "tm_name" : "金沙河" , "logo_url" : "/static/default.jpg" , "id" : 7 } , "tableName" : "base_trademark" } { "database" : "gmall2021-flink" , "before" : { } , "opt_type" : "insert" , "after" : { "tm_name" : "索芙特" , "logo_url" : "/static/default.jpg" , "id" : 8 } , "tableName" : "base_trademark" } { "database" : "gmall2021-flink" , "before" : { } , "opt_type" : "insert" , "after" : { "tm_name" : "CAREMiLLE" , "logo_url" : "/static/default.jpg" , "id" : 9 } , "tableName" : "base_trademark" } { "database" : "gmall2021-flink" , "before" : { } , "opt_type" : "insert" , "after" : { "tm_name" : "欧莱雅" , "logo_url" : "/static/default.jpg" , "id" : 10 } , "tableName" : "base_trademark" } { "database" : "gmall2021-flink" , "before" : { } , "opt_type" : "insert" , "after" : { "tm_name" : "香奈儿" , "logo_url" : "/static/default.jpg" , "id" : 11 } , "tableName" : "base_trademark" }
FlinkCDC的两种方式对比 FlinkCDC-DataStream 优点:可以监控多库多表;
缺点:需要自定义反序列化器,默认自带的不好用;
FlinkSQl 优点:不需要自定义反序列化器;
缺点:单表查询;